Introduction to Docker 
Prerequisites
In order to complete these exercises we STRONGLY recommend that you set up a personal GitHub and DockerHub account (account creation for both services is free).
There are no specific skills needed for this tutorial beyond elementary command line ability and using a text editor.
We are going to be using GitHub CodeSpaces for the hands on portion of the workshop, which features VS Code as a fully enabled development environment with Docker already installed.
CodeSpaces is a featured product from GitHub and requires a paid subscription or Academic account for access. Your account will temporarily be integrated with the course GitHub Organization for the next steps in the workshop.
Our instructions on starting a new CodeSpace are here.
Installing Docker on your personal computer
We are going to be using virtual machines on the cloud for this course, and we will explain why this is a good thing, but there may be a time when you want to run Docker on your own computer.
Installing Docker takes a little time but it is reasonably straight forward and it is a one-time setup.
Installation instructions from Docker Official Docs for common OS and chip architectures:
Never used a terminal before?
That is  OK! (This person never used a terminal until after their terminal degree, and now they actually PREFER to work in it for writing code)
Don't be afraid or ashamed, but be ready to learn some new skills -- we promise it will be worth your while and even FUN!
Before venturing much further, you should review the Software Carpentry lessons on "The Unix Shell" and "Version Control with Git" -- these are great introductory lessons related to the skills we're teaching here.
You've given up on ever using a terminal? No problem, Docker can be used from graphic interfaces, like Docker Desktop, or platforms like Portainer. We suggest you read through their documentation on how to use Docker.
Fundamental Docker Commands 
Docker commands in the terminal use the prefix docker.
Note
For every command listed, the correct execution of the commands through the command line is by using `docker` in front of the command: for example `docker help` or `docker search`. Thus, every :material-docker: = `docker`.
help
Like many other command line applications the most helpful flag is the help command which can be used with the Management Commands:
search
We talk about the concept of Docker Registries in the next section, but you can search the public list of registeries by using the docker search command to find public containers on the Official Docker Hub Registry:
pull
Go to the Docker Hub and type hello-world in the search bar at the top of the page.
Click on the 'tag' tab to see all the available 'hello-world' images.
Click the 'copy' icon at the right to copy the docker pull command, or type it into your terminal:
Note
If you leave off the `:` and the tag name, it will by default pull the `latest` image
$ docker pull hello-world
Using default tag: latest
latest: Pulling from library/hello-world
2db29710123e: Pull complete
Digest: sha256:bfea6278a0a267fad2634554f4f0c6f31981eea41c553fdf5a83e95a41d40c38
Status: Downloaded newer image for hello-world:latest
docker.io/library/hello-world:latest
Now try to list the files in your current working directory:
Where is the image you just pulled?
Docker saves container images to the Docker directory (where Docker is installed).
You won't ever see them in your working directory.
Use 'docker images' to see all the images on your computer:
adding yourself to the Docker group on Linux
Depending on how and where you've installed Docker, you may see a permission denied error after running $ docker run helo-world command.
If you're on Linux, you may need to prefix your Docker commands with sudo.
Alternatively to run docker command without sudo, you need to add your user name (who has root privileges) to the docker "group".
Create the docker group:
Add your user to the docker group::
Log out or close terminal and log back in and your group membership will be initiated
run
The single most common command that you'll use with Docker is docker run (see official help manual for more details).
docker run starts a container and executes the default "entrypoint", or any other "command" that follows run and any optional flags.
What is an entrypoint?
An entrypoint is the initial command(s) executed upon starting the Docker container. It is listed in the Dockerfile as ENTRYPOINT and can take 2 forms: as commands followed by parameters (ENTRYPOINT command param1 param2) or as an executable (ENTRYPOINT [“executable”, “param1”, “param2”])
In the demo above, you used the docker pull command to download the hello-world:latest image.
What about if you run a container that you haven't downloaded?
When you executed the command docker run alpine:latest, Docker first looked for the cached image locally, but did not find it, it then ran a docker pull behind the scenes to download the alpine:latest image and then execute your command.
When you ran docker run alpine:latest, you provided a command ls -l, so Docker started the command specified and you saw the listing of the Alpine file system (not your host system, this was insice the container!).
images
You can now use the docker images command to see a list of all the cached images on your system:
$ docker images
REPOSITORY              TAG                 IMAGE ID            CREATED             VIRTUAL SIZE
alpine                  latest              c51f86c28340        4 weeks ago         1.109 MB
hello-world             latest              690ed74de00f        5 months ago        960 B
Inspecting your containers
To find out more about a Docker images, run docker inspect hello-world:latest
ps
Now it's time to see the docker ps command which shows you all containers that are currently running on your machine.
Since no containers are running, you see a blank line.
Let's try a more useful variant: docker ps --all
$ docker ps --all
CONTAINER ID   IMAGE                                            COMMAND                  CREATED          STATUS                      PORTS     NAMES
a5eab9243a15   hello-world                                      "/hello"                 5 seconds ago    Exited (0) 3 seconds ago              loving_mcnulty
3bb4e26d2e0c   alpine:latest                                    "/bin/sh"                17 seconds ago   Exited (0) 16 seconds ago             objective_meninsky
192ffdf0cbae   opensearchproject/opensearch-dashboards:latest   "./opensearch-dashbo…"   3 days ago       Exited (0) 3 days ago                 opensearch-dashboards
a10d47d3b6de   opensearchproject/opensearch:latest              "./opensearch-docker…"   3 days ago       Exited (0) 3 days ago                 opensearch-node1
What you see above is a list of all containers that you have run.
Notice that the STATUS column shows the current condition of the container: running, or as shown in the example, when the container was exited.
stop
The stop command is used for containers that are actively running, either as a foreground process or as a detached background one.
You can find a running container using the docker ps command.
rm
You can remove individual stopped containers by using the rm command. Use the ps command to see all your stopped contiainers:
@user ➜ /workspaces $ docker ps -a
CONTAINER ID   IMAGE                        COMMAND                  CREATED              STATUS                          PORTS     NAMES
03542eaac9dc   hello-world                  "/hello"                 About a minute ago   Exited (0) About a minute ago             unruffled_nobel
Use the first few unique alphanumerics in the CONTAINER ID to remove the stopped container:
Check to see that the container is gone using ps -a a second time (-a is shorthand for --all; the full command is docker ps -a or docker ps --all).
rmi
The rmi command is similar to rm but it will remove the cached images. Used in combination with docker images or docker system df you can clean up a full cache
@user ➜ /workspaces/ (mkdocs ✗) $ docker images
REPOSITORY                   TAG       IMAGE ID       CREATED        SIZE
opendronemap/webodm_webapp   latest    e075d13aaf35   21 hours ago   1.62GB
redis                        latest    a10f849e1540   5 days ago     117MB
opendronemap/nodeodm         latest    b4c50165f838   6 days ago     1.77GB
hello-world                  latest    feb5d9fea6a5   7 months ago   13.3kB
opendronemap/webodm_db       latest    e40c0f274bba   8 months ago   695MB
@user ➜ /workspaces (mkdocs ✗) $ docker rmi hello-world
Untagged: hello-world:latest
Untagged: hello-world@sha256:10d7d58d5ebd2a652f4d93fdd86da8f265f5318c6a73cc5b6a9798ff6d2b2e67
Deleted: sha256:feb5d9fea6a5e9606aa995e879d862b825965ba48de054caab5ef356dc6b3412
Deleted: sha256:e07ee1baac5fae6a26f30cabfe54a36d3402f96afda318fe0a96cec4ca393359
@user ➜ /workspaces (mkdocs ✗) $
system
The system command can be used to view information about containers on your cache, you can view your total disk usage, view events or info.
You can also use it to prune unused data and image layers.
To remove all cached layers, images, and data you can use the -af flag for all and force
tag
By default an image will recieve the tag latest when it is not specified during the docker build
Image names and tags can be created or changed using the docker tag command.
You can also change the registry name used in the tag:
The cached image laters will not change their sha256 and both image tags will still be present after the new tag name is generated.
push
By default docker push will upload your local container image to the Docker Hub
We will cover push in more detail at the end of Day 2, but the essential functionality is the same as pull.
Also, make sure that your container has the appropriate tag
First, make sure to log into the Docker Hub, this will allow you to download private limages, to upload private/public images:
Alternately, you can link GitHub / GitLab accounts to the Docker Hub.
To push the image to the Docker Hub:
or
or, to a private registry, here we push to CyVerse private harbor.cyverse.org registry which uses "project" sub folders:
Commands & Entrypoints
We will cover the differences in CMD and ENTRYPOINT on Day 2 when we build our own images, but it is important to understand that a container can have a command appended to the docker run function.
When a image has no commands or entrypoints specified in its Dockerfile, it will default to running a /bin/sh syntax. In those cases, you can add a command when the congtainer is run:
the Docker client dutifully ran the echo command in our alpine container and then exited.
If you've noticed, all of that happened pretty quickly. Imagine booting up a virtual machine, running a command and then killing it. Now you know why they say containers are fast!
Interactive Commands with Containers
Lets try another command, this time to access the container as a shell:
Wait, nothing happened, right?
Is that a bug?
Well, no.
The container will exit after running any scripted commands such as sh, unless they are run in an "interactive" terminal (TTY) - so for this example to not exit, you need to add the -i for interactive and -t for TTY.
You can run them both in a single flag as -it, which is the more common way of adding the flag:
The prompt should change to something more like / #.
You are now running a shell inside the container!
Try out a few commands like ls -l, uname -a and others.
Exit out of the container by giving the exit command.
Making sure you've exited the container
If you type exit your container will exit and is no longer active. To check that, try the following:
$ docker ps --latest
CONTAINER ID        IMAGE                 COMMAND                  CREATED             STATUS                          PORTS                    NAMES
de4bbc3eeaec        alpine                "/bin/sh"                3 minutes ago       Exited (0) About a minute ago                            pensive_leavitt
If you want to keep the container active, then you can use keys ctrl +p ctrl +q. To make sure that it is not exited run the same docker ps --latest command again:
$ docker ps --latest
CONTAINER ID        IMAGE                 COMMAND                  CREATED             STATUS                         PORTS                    NAMES
0db38ea51a48        alpine                "sh"                     3 minutes ago       Up 3 minutes                                            elastic_lewin
Now if you want to get back into that container, then you can type docker attach <container id>. This way you can save your container:
House Keeping and Cleaning Up Exited Containers
Managing Docker Images
In the previous example, you pulled the alpine image from the registry and asked the Docker client to run a container based on that image. To see the list of images that are available locally on your system, run the docker images command.
    $ docker images
    REPOSITORY                 TAG                 IMAGE ID            CREATED             SIZE
    ubuntu                     bionic              47b19964fb50        4 weeks ago         88.1MB
    alpine                     latest              caf27325b298        4 weeks ago         5.53MB
    hello-world                latest              fce289e99eb9        2 months ago        1.84kB
Above is a list of images that I've pulled from the registry and those I've created myself (we'll shortly see how). You will have a different list of images on your machine. The TAG refers to a particular snapshot of the image and the ID is the corresponding unique identifier for that image.
For simplicity, you can think of an image akin to a Git repository - images can be committed with changes and have multiple versions. When you do not provide a specific version number, the client defaults to latest.
Clutter and Cache
Docker images are cached on your machine in the location where Docker was installed. These image files are not visible in the same directory where you might have used docker pull <imagename>.
Some Docker images can be large. Especially data science images with many scientific programming libraries and packages pre-installed.
Checking your system cache
Pulling many images from the Docker Registries may fill up your hard disk!

To inspect your system and disk use:

```
$ docker system info
$ docker system df
```

To find out how many images are on your machine, type:

```
$ docker images
```

To remove images that you no longer need, type:

```
$ docker system prune
```

This is where it becomes important to differentiate between *images*, *containers*, and *volumes* (which we'll get to more in a bit).

You can take care of all of the dangling images and containers on your system.

Note, that `prune` will not remove your cached *images*

```
$ docker system prune
    WARNING! This will remove:
    - all stopped containers
    - all networks not used by at least one container
    - all dangling images
    - all dangling build cache

Are you sure you want to continue? [y/N]
```

If you added the `-af` flag it will remove "all" `-a` dangling images, empty containers, AND ALL CACHED IMAGES with "force" `-f`.
Managing Data in Docker
It is possible to store data within the writable layer of a container, but there are some limitations:
- The data doesn’t persist when that container is no longer running, and it can be difficult to get the data out of the container if another process needs it.
- A container’s writable layer is tightly coupled to the host machine where the container is running. You can’t easily move the data somewhere else.
- Its better to put your data into the container AFTER it is built - this keeps the container size smaller and easier to move across networks.
Docker offers three different ways to mount data into a container from the Docker host:
- Volumes
- tmpfs mounts
- Bind mounts
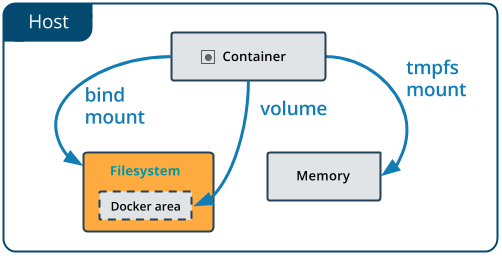
When in doubt, volumes are almost always the right choice.
Volumes
Volumes are often a better choice than persisting data in a container’s writable layer, because using a volume does not increase the size of containers using it, and the volume’s contents exist outside the lifecycle of a given container. While bind mounts (which we will see in the Advanced portion of the Camp) are dependent on the directory structure of the host machine, volumes are completely managed by Docker. Volumes have several advantages over bind mounts:
- Volumes are easier to back up or migrate than bind mounts.
- You can manage volumes using Docker CLI commands or the Docker API.
- Volumes work on both UNIX and Windows containers.
- Volumes can be more safely shared among multiple containers.
- A new volume’s contents can be pre-populated by a container.
When Should I Use the Temporary File System mount?
If your container generates non-persistent state data, consider using a tmpfs mount to avoid storing the data anywhere permanently, and to increase the container’s performance by avoiding writing into the container’s writable layer. The data is written to the host's memory instead of a volume; When the container stops, the tmpfs mount is removed, and files written there will not be kept.
Choose the -v flag for mounting volumes
-v or --volume: Consists of three fields, separated by colon characters (:).
The fields must be in the correct order, and the meaning of each field is not immediately obvious.
- The first field is the path on your local machine that where the data are.
- The second field is the path where the file or directory are mounted in the container.
- The third field is optional, and is a comma-separated list of options, such as
ro(read only).
So what if we wanted to work interactively inside the container?
Once you're in the container, you will see that the /work directory is mounted in the working directory.
Any data that you add to that folder outside the container will appear INSIDE the container. And any work you do inside the container saved in that folder will be saved OUTSIDE the container as well.
Working with Interactive Containers
Let's go ahead and run some Integrated Development Environment images from "trusted" organizations on the Docker Hub Registry.
Jupyter Lab or RStudio-Server IDE
In this section, let's find a Docker image which can run a Jupyter Notebook
Search for official images on Docker Hub which contain the string 'jupyter'
It should return something like:
NAME                                   DESCRIPTION                                     STARS     OFFICIAL   AUTOMATED
jupyter/datascience-notebook           Jupyter Notebook Data Science Stack from htt…   912
jupyter/all-spark-notebook             Jupyter Notebook Python, Scala, R, Spark, Me…   374
jupyter/scipy-notebook                 Jupyter Notebook Scientific Python Stack fro…   337
jupyterhub/jupyterhub                  JupyterHub: multi-user Jupyter notebook serv…   307                  [OK]
jupyter/tensorflow-notebook            Jupyter Notebook Scientific Python Stack w/ …   298
jupyter/pyspark-notebook               Jupyter Notebook Python, Spark, Mesos Stack …   224
jupyter/base-notebook                  Small base image for Jupyter Notebook stacks…   168
jupyter/minimal-notebook               Minimal Jupyter Notebook Stack from https://…   150
jupyter/r-notebook                     Jupyter Notebook R Stack from https://github…   44
jupyterhub/singleuser                  single-user docker images for use with Jupyt…   43                   [OK]
jupyter/nbviewer                       Jupyter Notebook Viewer                         27                   [OK]
Search for images on Docker Hub which contain the string 'rstudio'
NAME                                           DESCRIPTION                                     STARS     OFFICIAL   AUTOMATED
rocker/rstudio                                 RStudio Server image                            389                  [OK]
rstudio/r-base                                 Docker Images for R                             24
rocker/rstudio-stable                          Build RStudio based on a debian:stable (debi…   16                   [OK]
rstudio/rstudio-server-pro                     Deprecated Docker images for RStudio Server …   10
rstudio/r-session-complete                     Images for sessions and jobs in RStudio Serv…   10
rstudio/plumber                                                                                6
rstudio/rstudio-connect                        Default Docker image for RStudio Connect        4
rstudio/r-builder-images-win                                                                   3
rstudio/rstudio-workbench                      Docker Image for RStudio Workbench (formerly…   2
saagie/rstudio                                 RStudio with sparklyr, Saagie's addin and ab…   2                    [OK]
ibmcom/rstudio-ppc64le                         Integrated development environment (IDE) for…   2
rstudio/checkrs-tew                            Test Environment: Web                           1                    [OK]
rstudio/rstudio-package-manager                Default Docker image for RStudio Package Man…   1
rstudio/shinyapps-package-dependencies         Docker images used to test the install scrip…   1
rstudio/rstudio-workbench-preview                                                              1
Untrusted community images
An important thing to note: None of these Jupyter or RStudio images are 'official' Docker images, meaning they could be trojans for spyware, malware, or other nasty warez.
Understanding PORTS
When we want to run a container that runs on the open internet, we need to add a TCP or UDP port number from which we can access the application in a browser using the machine's IP (Internet Protocol) address or DNS (Domain Name Service) location.
To do this, we need to access the container over a separate port address on the machine we're working on.
Docker uses the flag --port or -p for short followed by two sets of port numbers.
Exposing Ports
Docker can in fact expose all ports to a container using the capital -P flag
For security purposes, it is generally NEVER a good idea to expose all ports.
Typically these numbers can be the same, but in some cases your machine may already be running another program (or container) on that open port.
The port has two sides left:right separated by a colon. The left side port number is the INTERNAL port that the container software thinks its using. The right side number is the EXTERNAL port that you can access on your computer (or virtual machine).
Here are some examples to run basic RStudio and Jupyter Lab:
note: on CodeSpaces, the reverse proxy for the DNS requires you to turn off authentication
Preempting stale containers from your cache
We've added the --rm flag, which means the container will automatically removed from the cache when the container is exited.
When you start an IDE in a terminal, the terminal connection must stay active to keep the container alive.
Detaching your container while it is running
If we want to keep our window in the foreground we can use the -d - the detached flag will run the container as a background process, rather than in the foreground.
When you run a container with this flag, it will start, run, telling you the container ID:
Note, that your terminal is still active and you can use it to launch more containers.To view the running container, use the docker ps command.
Docker Commands
Here is a compiled list of fundamental Docker Commands:
| Command | Usage | Example |
|---|---|---|
pull |
Downloads an image from Docker Hub | docker pull hello-world:latest |
run |
runs a container with entrypoint | docker run -it user/image:tag |
build |
Builds a docker image from a Dockerfile in current working directory | docker build -t user/image:tag . |
images |
List all images on the local machine | docker images list |
tag |
Adds a different tag name to an image | docker tag hello-world:latest hello-world:new-tag-name |
login |
Authenticate to the Docker Hub (requires username and password) | docker login |
push |
Upload your new image to the Docker Hub | docker push user/image:tag |
inspect |
Provide detailed information on constructs controlled by Docker | docker inspect containerID |
ps |
List all containers on your system | docker ps -a |
rm |
Delete a stopped or running container | docker rm -f <container ID> |
rmi |
Delete an image from your cache | docker rmi hello-world:latest |
stop |
Stop a running container | docker stop alpine:latest |
system |
View system details, remove old images and containers with prune |
docker system prune |
push |
Uploads an image to the Docker Hub (or other private registry) | docker push username/image:tag |