General Notes and Discussions
This section summarizes general notes, discussions and questions raised during both the Basics and Advanced section of Container Camp.
Before you Continue
This page is for archival and informative use only, reproduction (such as access to JetStream2 allocations, CodeSpaces) is limited.
Basics
Queries
Q: What is an image?
A: A file that lives in the cache on your computer... where 'cache' can be thought of like a desk. It's faster to retrieve a file from your desk than from the filing cabinet
Q: What is a container?
A: It's a virtualized run-time environment which starts from the image. A docker image is what you build. It has all of the software necessary to run the code. The Container is when you "activate" the image, an extra layer where you can work on top of the software you put in the image.
The built image will contain its own OS - it will make no difference where you build your container. When you build an image, you can specify the architecture of the machine you want it to run on.
Manage resources for your container by using commands to stop, pause, restart, remove a container.
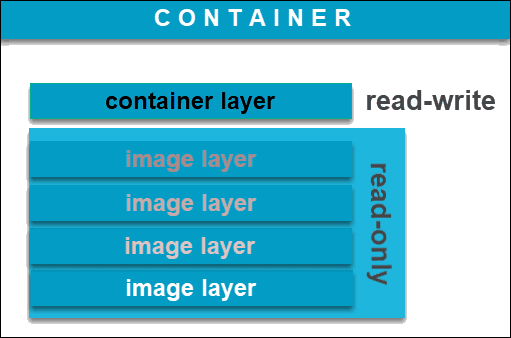
Q: How do I work with data and containers?
A: Containers do not contain large amounts of data, as these will take space in the writable layer of the container (see above image). Instead, it is suggested to use Volumes as a best practice. A Volume is a directory that lives outside of the container that can be attached to said container. Once attached, the contents of the directory will be viewable and accessible to the container. In order to attach the volume, one must specify the directory on the computer AND the destination folder, separated by a colon (:). The format is as follows -v <directory on computer>:<directory in container>.
Q: Ports. What are ports and why do we need them?
A: Ports are where network connections start and end. These are not physical, and these allow software to connect to a network. Our computers run hundreds of processes, and chance is a lot of these processes require a connection to the network. In order for these processes to access the network, ports are required. A single process is assigned a single port - and this is how these software can connect to the internet. The reason why we need to open a port for Docker, is because the Docker container is trying to communicate with the network, however it requires us, the user, to assign a port for it. Without us assigning the port to the Docker container, the connection to the network cannot happen. More information on ports can be found at: - CloudFlare: Understanding Ports - Internet Assigned Numbers Authority Port List - List of TCP and UDP port numbers
Q: What is Docker's relationship with things like networking, ethernet, USB, HDMI? Are these things naturally closed or naturally open? Are there interfaces that you cannot access from docker?
A: Docker is able to do Networking as it has its own networking subsystem (and commands). As this is an advanced topic, let me direct you to the official networking documentation here: https://docs.docker.com/network/
Q: Is there a way to emulate a display in Docker so that certain rendering code (like the plotting libraries in python) don't break when run in a container?
A: [unsure if this is what you were looking for] Docker is able to run GUI applications; A display can be specified using the -e (environment) flag such as -e DISPLAY=$DISPLAY. $DISPLAY can usually be specified to $0, targeting the primary display. This little blog post may be able to help you further.
Q: What should we know about accessing GPUs from docker? Won't the hardware you're running on affect the runnability of a container, despite the containerization of the image?
A: NVIDIA Docker now uses a special flag for Docker (rather than needing its own installation) https://github.com/NVIDIA/nvidia-docker.

Q: Is malware ever a problem with Dockerfiles? Can you run a malicious image?
A: It seems that Docker (and Kubernetes) related malware are now a thing. From personal experience, I have never run into issues.
Q: If containers are software, why should I bother using a container instead of the software itself?
A: Containers offer 3 great solutions to common problems: (1) reproducibility (2) version control. Docker images contain all of the required software in the form of layers, including specific versions of libraries. This allows to easily share your image and software without worring about collaborators having to install the correct software and version. (3) portability, so you can run it anywhere.
Dockerfiles Hands-on
Go to an example directory in the intro2docker repository with a Dockerfile
Build the container using the build command. Make sure to include the .
Note
The container should get the default `latest` tag if it is not specified in the `docker build` command with the name `test/alpine`
Start the container using the run command.
To run the container and override its CMD, it will use its own shell sh:
Dockerfiles are like your recipie book, and like every recipie book you have instructions. The instructions aren't for the user, but for Docker itself. These instruction are the capitalized commands you see at the beginning of lines, and these tell Docker what to do:
| Instruction | Command |
|---|---|
| FROM | Instructs to use a specific Docker image |
| LABEL | Adds metadata to the image |
| RUN | Executes a specific command |
| ENV | Sets environmental variables |
| COPY | Copies a file from a specified location to the image |
| CMD | Sets a command to be executed when running a container |
| ENTRYPOINT | Configures and run a container as an executable |
| USER | Used to set User specific information |
| EXPOSE | exposes a specific port |
*the above list is nonexhaustive, visit the official Docker documentation for more information and further instructions.
Pushing to DockerHub
Build your docker image with
then, log in to Docker with
This will then ask for your Password; type in your password (it will NOT show you the password).
If it does not login automatically, please follow the instructions here.
Once you have logged in, push your docker to the DockerHub registry with
Your newly built Docker image now lives on DockerHub. You can view it at https://hub.docker.com/r/<username>/<Docker image>
Assigning Users
Create a new folder called ubuntu
Change into the folder
Create a Dockerfile
ARG VERSION=18.04

FROM ubuntu:$VERSION

RUN apt-get update -y && apt-get install -y gnupg wget python3 python3-distro && \
    wget -qO - https://packages.irods.org/irods-signing-key.asc | apt-key add - && \
    echo "deb [arch=amd64] https://packages.irods.org/apt/ $(lsb_release -sc) main" >> /etc/apt/sources.list.d/renci-irods.list && \
    apt-get update && apt-get install irods-icommands -y

COPY irods_environment.json /home/ubuntu/.irods/

RUN useradd ubuntu && \
    chown -R ubuntu:ubuntu /home/ubuntu

USER ubuntu
Create a file called
irods_environment.json
Build the container using your dockerhub username
Run with
Q: What did we do?A: We created an image whose the user is specified.
Q: Why?
A: When creating interactive containers, these containers are not built with root privileges. Assigning a specific user helps with defining the priviledges you want users to have.
Q: Wait, what?
A: When pulling a base image with the FROM instruction, sometimes the user is already defined. The only user with priviledges will be that already defined user. Therefore, in order to have the "right" priviledges, you have to assign the right user in your Dockerfile.
RStudio Dockerfile
The above steps where necessary in order to understand why in this following step we need to define a user.
Navigate to rstudio/verse with
and create a Dockerfile:
FROM rocker/verse:4.2.0

# Install your own stuff below
RUN install2.r --error \
    # Added Packages
    PerformanceAnalytics \
    boot \
    devtools \
    dlm \
    dplyr \
    foreign \
    lubridate \
    plotly \
    truncreg \
    ggridges
Docker Commands Cheat Sheets:
- https://cyverse-learning-materials.github.io/container-camp/docker/intro/#docker-commands
- https://dockerlabs.collabnix.com/docker/cheatsheet/
- https://github.com/wsargent/docker-cheat-sheet
- https://spacelift.io/blog/docker-commands-cheat-sheet
Advanced
Github Actions:
- GitHub not only can host your code, but it can be used to create Docker images right within the GitHub repo using GitHub Actions.
- You first require to connect your DockerHub and your GitHub accounts:
- Navigate to Settings (in your repository)
- Select Secrets > Actions.
- Add a New Repository Secret and name it "DOCKER_HUB_USERNAME"; Paste here your Docker Account name.
- Add a New Repository Secret and name it "DOCKER_HUB_ACCESS_TOKEN", and DO NOT CLOSE IT
- Navigate to DockerHub and click Account Settings > Security > New Access Token
- Add a name you can recognize and COPY the password and add it to "DOCKER_HUB_ACCESS_TOKEN" (step 4). Now save and close.
Your GitHub and DockerHub are connected!
- To create a new GitHub Action, navigate to the Action button on the top of your repository (create a repository first!), and click on New Workflow; select Docker Image.
- Delete the template pase the following:
name: <NAME OF ACTION>

on:
  push:
    branches: [ main ]
  pull_request:
    branches: [ main ]

jobs:

  build:

    runs-on: ubuntu-latest

    steps:
      -
        name: Checkout
        uses: actions/checkout@v2
      -
        name: Login to Docker Hub
        uses: docker/login-action@v1
        with:
          username: ${{ secrets.DOCKER_HUB_USERNAME }}
          password: ${{ secrets.DOCKER_HUB_ACCESS_TOKEN }}
      -
        name: Build and push
        uses: docker/build-push-action@v2
        with:
          context: .
          file: ./Dockerfile
          push: true
          tags: ${{ secrets.DOCKER_HUB_USERNAME }}/<NAME OF IMAGE ON DOCKERHUB>:<VERSION>
Remember to add a Dockerfile to your main repository!
Working on the Cloud
We discussed working with JetStream2. - Access JetStream2 exoshpere - Access JetStream2 CyVerse (CACAO)
Summary of running JS2 GPU Virtual Machines (VM):
- Navigate to : https://jetstream2.exosphere.app/
- Click Create > Instance
- Select Ubuntu 20.04
- Select a
g3.smallInstance and select (enable web desktop), click create.
Wait for VM to spin up, test for functionality by:
1. click on web shell
2. From web shell, run nvidia-smi (if it returns a table, you are good to go)
Running xpra on JS2:
$ export DISPLAY=:0
$ xinit &
$ docker run --gpus all --rm -it -p 9876:9876 -v /tmp/.X11-unix:/tmp/.X11-unix -e DISPLAY -e XAUTHORITY -e QT_X11_NO_MITSHM=1 -e NVIDIA_DRIVER_CAPABILITIES=all harbor.cyverse.org/vice/xpra/cudagl:20.04
Running jupyter-pytorch on JS2:
$ docker run --gpus all -p 8888:8888 -e REDIRECT_URL=http://localhost:8888 harbor.cyverse.org/vice/jupyter/pytorch:latest
Adding tools to CyVerse
Running an app in CyVerse is a 2 step process: 1. Adding a Tool 2. Using the Tool for the App
Adding the Tool:
- Navigate to Apps > Tools > More Actions > Add Tools
- Add Name, Version (for CyVerse, first block)
- Either paste your docker image DockerHub URL or the
<repo>/<image>; add the<tag>in the Tag field. - Specifically for RStudio, add Port 80 (due to reverse port).
Creating the App:
- Navigate to Apps, and select Create then Create New App
- Add a unique App Name and Description.
- Click on Select Tool and select the tool you just created, and select interactive.
- Click Next (and next, and next...), then click Save and Launch.
Your app should be avaiable to access in a few minutes.
Singularity
A solution to run containers on a cluster/HPC.
Q: Why can't I run docker on the HPC?
A: Docker requires root proviledges (sudo), and these cannot be executed on the HPC. The HPC is a shared space, imagine everyone having root priviledges! All the possible unforseen changes to the system made by everyone will lead to a system error.
Using the UArizona HPC as an example:
- with terminal,
sshinto the HPC withssh </user>@hpc.arizona.edu, enter your password (and DUO auth). - Choose your cluser node (Puma is suggested, accessed with
puma), typeinteractiveand wait for your interactive session to spin up.
Follow lesson examples at TACC singularity basics.
Submitting jobs on an HPC system running the SLURM manager
SLURM is a job scheduler/manager, and in order to run jobs on a cluster, you need to write a shell script (.sh) with a list of instructions.
Q: Why can't I just run things on my node?
A: As HPCs are shared machines, there are numbers of submitted concurrent jobs. Ultimately, the best way to run all of these jobs, is to schedule when to run all jobs submitted by users.
Said script requires a list of SLURM instructions ("batch commands") prior to the actual job commands. Following is an example of said script:
#!/bin/bash

#SBATCH -J myjob                         # Job name
#SBATCH -o output.%j                     # Name of stdout output file (%j expands to jobId)
#SBATCH -p development                   # Queue name
#SBATCH -N 1                             # Total number of nodes requested (56 cores/node)
#SBATCH -n 1                             # Total number of mpi tasks requested
#SBATCH -t 02:00:00                      # Run time (hh:mm:ss) - 4 hours
#SBATCH --reservation ContainerTraining  # a reservation only active during the training

singularity exec docker://python:latest /usr/local/bin/python
For more examples see the TACC documentation on batch commands.
Open Science Grid: Distributed High Throughput Computing
OSG: consortium of rsearchers and institutions who share compute and data resources for distributed HTC in support for open science.
(OSG requires you to sign up through a meeting*)
Using Docker images/containres offers consistent, complete and reproducible environment across the OSG: "running containers on the OSG is like bringing your own utensils to someone else's kitchen".
OSG keeps dockers in extracted format in the cvmfs (official cvmfs documentation), making it "snappier" to load and run the image. IT stores each of the layers in an uncompressed format, thus you users only spin up the necessary layers.
Running Singularity
Installing Singularity
Installing Singularity requires Go: see instructions in the Singularity documentation.
In summary:
$ wget https://go.dev/dl/go1.18.2.linux-amd64.tar.gz
$ sudo tar -C /usr/local -xzvf go$VERSION.1.18.2-amd64.tar.gz
$ echo 'export PATH=/usr/local/go/bin:$PATH' >> ~/.bashrc && source ~/.bashrc
$ export VERSION=3.9.5 && # adjust this as necessary \
    wget https://github.com/sylabs/singularity/releases/download/v${VERSION}/singularity-ce-${VERSION}.tar.gz && \
    tar -xzf singularity-ce-${VERSION}.tar.gz && \
    cd singularity-ce-${VERSION}
$ ./mconfig && \
    make -C builddir && \
    sudo make -C builddir install
Running Docker Images with Singularity
Singularity is able to create a .sif (singularity Image) from a Docker Image.
To pull Docker Images with Singularity do
To run a Docker Image with Singularity doSingularity also comes with an exec function, which executes a command within the container
--bind flag, which mounts a volume (the /data folder) to the container. The command also lists (ls) the content of the data folder.
Reminder: it is important that you don't forget the version!!
Writing the Singularity recipie
An example of a recipie is here below:
Bootstrap: docker
From: ubuntu:16.04
%help
    This is the container help section.

%post
    apt-get -y update
    apt-get -y install fortune cowsay lolcat

%environment
    export LC_ALL=C
    export PATH=/usr/games:$PATH

%runscript
    fortune | cowsay | lolcat
| Dockerfile | FROM | ARG | COPY | RUN | ENV | LABEL | CMD |
|---|---|---|---|---|---|---|---|
| Singularity | Bootstrap: |
%post |
%files |
%post |
%environment |
%label |
%runscript |
To build the image, do
Notice how the above command uses sudo!
Singularity has its own Hub (like DockerHub): https://cloud.sylabs.io/
The SyLabs singularity allows to build singularity Images directly in the GUI online.
Kubernetes (K8s)
Q: What is Kubernentes?
A: Kubernetes is an open-source system for automating deployment, scaling, and management of containerized applications.
Here is an image of how a K8s cluseter looks like:

Image: A control plane (could be made of a single machine) manages and distributes jobs to worker nodes.
Installing K8s (on a UNIX system)
Installation of K8s has a number of documentations, here are the basic instructions.
$ curl -LO https://storage.googleapis.com/kubernetes-release/release/$(curl -s https://storage.googleapis.com/kubernetes-release/release/stable.txt)/bin/linux/amd64/kubectl
$ chmod +x kubectl
$ sudo mv ./kubectl /usr/local/bin/kubectl
Initiating K8s head
K8s uses kubectl to control various pods.
Prior to running kubectl, during the installation, a folder named kube was created in your ~/. folder. There is an unpopulated config file in ~/.kube/ - for today's example, populate the config with
apiVersion: v1
clusters:
- cluster:
    certificate-authority-data: <authority data>
    server: <IP:port>
  name: default
contexts:
- context:
    cluster: default
    user: default
  name: default
current-context: default
kind: Config
preferences: {}
users:
- name: default
  user:
    client-certificate-data: <certificate data>
    client-key-data: <key data>
Warning
The above code has been modified `<data>` to protect information. The K8s head isn't online at the moment, and certificates change between config files.
Interacting with Pods (basically a container)
To launch a pod you require a pod config file. An example is
apiVersion: v1
kind: Pod
metadata:
  name: pod-<change-this-to-your-username>
spec:
  containers:
  - name: mypod
    image: alpine:3.14
    resources:
      limits:
        memory: 100Mi
        cpu: 100m
      requests:
        memory: 100Mi
        cpu: 100m
    command: ["sh", "-c", "sleep infinity"]
To create your pod, do
To initiate your pod, do
The above command will enter the shell of the pod.
You can see what pods are running with
To remove a pod, do
These are the absolute basics of Kubernentes. To read more, refer to the Kubernetes official documentation (and other massive number of online resources, Google is your friend!).
CACAO (alpha stage)
CACAO is "An event-driven multi-cloud service that enables resarchers and educators to effortlessly manage, scale and share their tools and workflows to any research-capable cloud using declarative templates" - Edwin Skidmore
Accessing CACAO (creating an SSH key)
CACAO can be access at https://js2.cyverse.org/. You can access the CACAO deployments with an SSH key (or web browser). In order to create an ssh key, do
Creates a file public key (your keys are usually in~/.ssh/).
To create a Kubernetes cluster, select "+ Deployment" and ensure that you're choosing Ubuntu 20 as your OS.
To launch a multi VM running JupyterHub, choose "+ Deployment" and "launch a multi-vm zero-to-jupyterhub".
Note: CACAO is still in Alpha phase. Read more on CACAO here.