Version Control
Learning Objectives
After this lesson, you should be able to:
- Understand the basics of
gitas a resource for reproducible programming - Describe tools and approaches to creating your
gitRepositories - Describe best practices for maintaining GitHub Organizations and Repositories
- Maintain own GitHub user profile and repositories
Version control refers to keeping track of the version of a file, set of files, or a whole project.
Some version control tools:
- Microsoft Office's Track Changes functionality
- Apple's Time Machine
- Google Docs' Version History
- Git
Version control is as much a philosophy as a set of tools; you don't need to master Git to utilize version control (though it is certainly a worthwhile tool for many researchers).

Git vs. GitHub
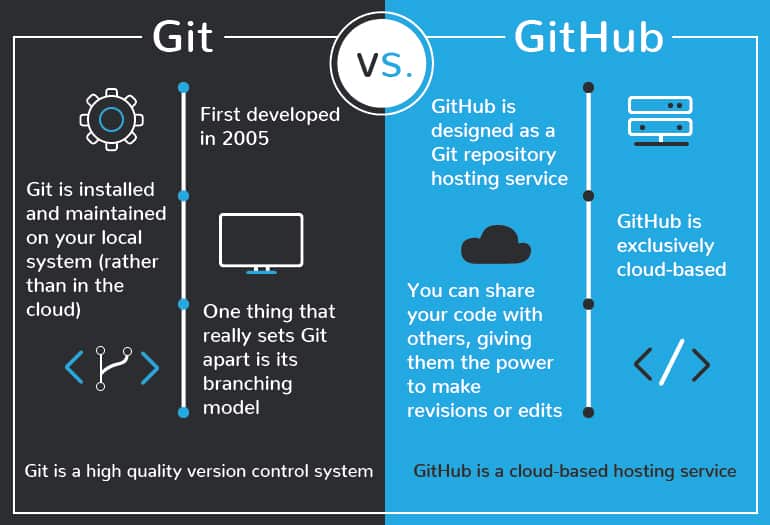
Git is a command-line program for version control of repositories. It keeps track of changes you make to files in your repository and stores those changes in a .git folder in that repository. These changes happen whenever you make a commit. Git stores the history of these commits in a "tree", so you can go back to any previous commit. By keeping track of the differences between commits, Git can be much more efficient than storing an entire copy of each version in a document's history.
You could utilize Git completely on its own, on your local computer, and get a lot of benefits. You will have a history of the changes you made to a project, allowing you to go back to any old version of your work. However, where Git really shines is in collaborative work. In order to effectively collaborate with others on a project, you need two basic features: a way to allow people to work in parallel, and a way to host repositories somewhere where everyone can access them. The first feature is branching, which is part of Git, and the hosting part can be taken care of by platforms like GitHub, GitLab, or Bitbucket. We will focus on GitHub.
GitHub is a site that can remotely host your Git repositories. By putting your repository onto GitHub, you get a backup of the repository, a way to collaborate with others, and a lot of other features.
Definitions
Git-related Definitions
Platforms:
- Git: tool for version control.
- GitHub: hosted server that is also interactive.
Locations and directions:
- repo: short for repository
- local: on your personal computer.
- remote: somewhere other than your computer. GitHub can host remote repositories.
- upstream: primary or main branch of original repository.
- downstream: branch or fork of repository.
Actions:
- clone: copy of a repository that lives locally on your computer. Pushing changes will affect the repository online.
- pull: getting latest changes to the repository on your local
computer.
- the fetch command does the same, however one needs to also merge the changes, whilst with pull, the merge action is automatic.
- branch: a history of changes to a repository. You can have parallel branches with separate histories, allowing you to keep a "main" version and development versions.
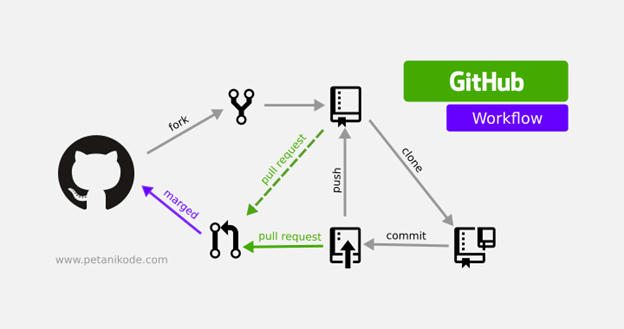
- fork: copy of someone else's repository stored locally on your account. From forks, you can make pull requests to the main branch.
- commit: finalize a change.
- push: add changes back to the remote repository.
- merge: takes changes from a branch or fork and applies them to the main.
These are also commands when paired with git!
Using the following synthax git <command> one can trigger an action. An example is git pull, which will pull all of the latest changes in the remote repository.
Funtional:
-
pull request: proposed changes to/within a repository.
-
issue: suggestions or tasks needed for the repository. Allows you to track decisions, bugs with the repository, etc.
(graphic's correction: marged merged)
Practical Git Techniques
The basic Git life cycle
When using Git for your version control, the usual life cycle is the following:
| Action | Explanation |
|---|---|
1. git clone <repository> |
Clones the target repository to your machine |
2. git status |
Checks whether there are changes in the remote, original repository |
3. git pull |
Pulls any change to your local repository |
4. git add <changes> |
Adds to a future commit any change |
5. git commit -m "<message>" |
Creates the commit and adds a descriptive message |
6. git push |
Pushes the changes commited from local to the remote repository |
If there are no branches or external pull requests, the basic Git life cycle is summarizable like this:
graph LR
A[1. git clone] --> B[2. git status] -->C([differences from origin?]):::colorclass;
C-->|yes| D[3. git pull]--> E;
C-->|no| E[4. git add];
E-->F[5. git commit] -->G[6. git push];
G-->B;
classDef colorclass fill:#f96
After learning the basics of using Git, which you can learn with the Software Carpentry Git Lesson, there are some next things that can be useful to learn. Here are a couple topics that are worth digging into more:
-
Using the Git log
- You can access using git log
- Will show you your commit history
- Useful for figuring out where you need to roll back to
-
Reverting
- There are a lot of different ways to "undo" something in Git
- Some are safer, some are a bit riskier
- Depends on what stage of the commit process you're in
- Here are some useful resources:
-
Branching
- This is important to learn if you're going to be doing any sort of collaboration
- Here is a fantastic resource for learning how git branching really works: https://learngitbranching.js.org/
- you will probably have to deal with merge conflicts at some point
- Merge conflicts happen when two branches are being merged, but they have different changes to the same part of a file
- Perhaps you are working on a feature branch, and you change line 61 in file.R, but someone else made a change to the main branch at line 61 in file.R. When you try to merge the feature and main branches, Git won't know which changes to line 61 in file.R are correct, and you will need to manually decide.
- Here are some good resources:
- Resolving merge conflicsresolving-a-merge-conflict-using-the-command-line
- git - ours & theirs, a CLI resource to help with conflicts
-
.gitignore
- You often want Git to completely ignore certain files
- Generated files (like HTML files from Markdown docs)
- IDE-specific files like in .RStudio or .vscode folders
- really big files, like data or images
- If you accidentally commit a really big file, GitHub might not let you push that commit
- If you have a huge file in Git, your repository size can get way too big
- This is a pain to solve, so use the .gitignore file ahead of time, but if you need to fix this, here is a great resource:
- Removing Large Files From git Using BFG and a Local Repository
Large Data and GitHub
GitHub allows commited files to be uploaded only if the file is of 100MB or less (with a warning being issued for files between 50MB and 100MB). Additionally, GitHub recommends to keep repositories below the 1GB threshold, as this also allows for quicker cloning and sharing of the repository. If a large file has been uploaded by mistake and you wish to remove it, you can follow these instrutctions.
If you do have to work with large files and Git, here are some questions to ask yourself:
- Is this data shareable?
- Are there alternative file hosting platforms I can use?
- How will this data impact the sharability of this repository?
- Am I using a .gitignore?
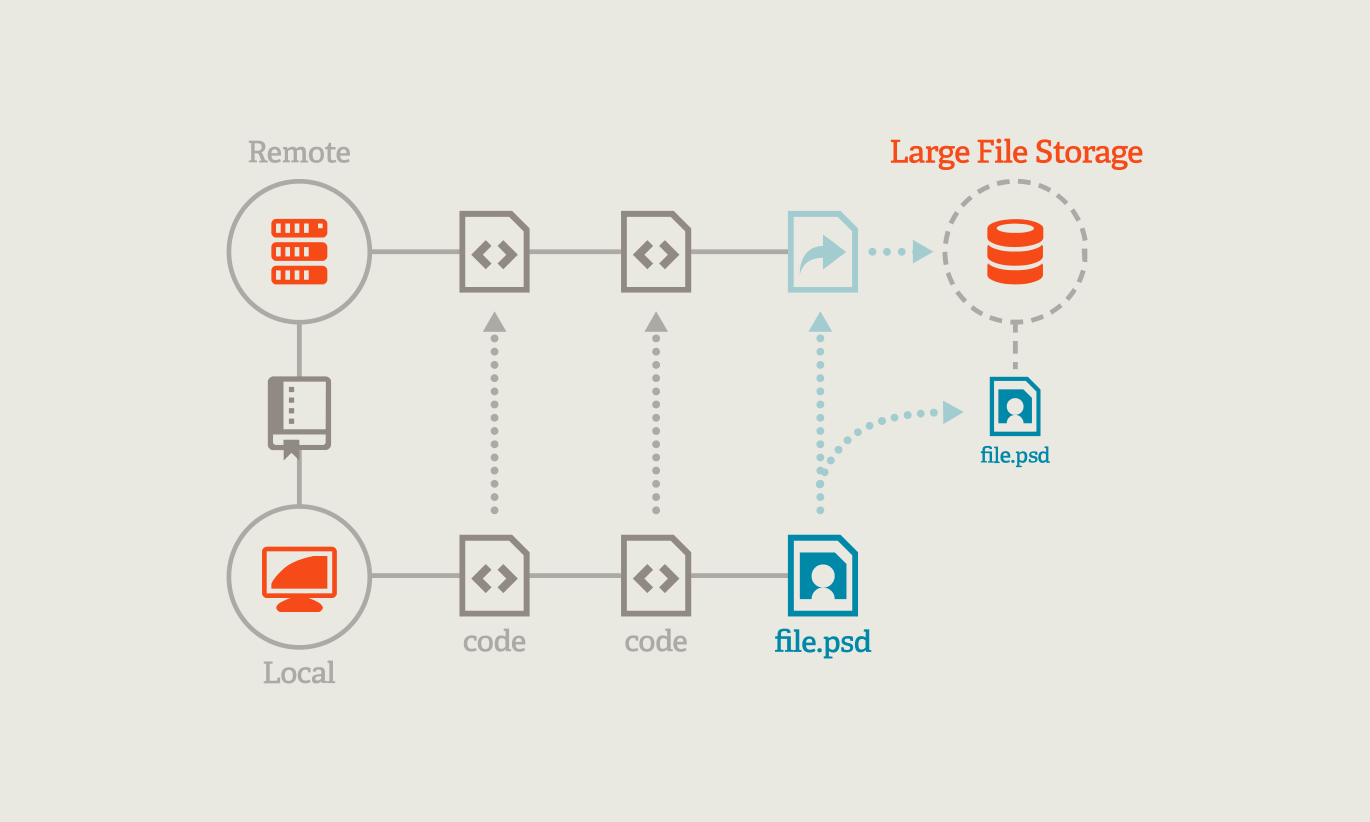
GitHub now offers the Git Large File Storage ( Git LFS): the system works by storing references to the file in your repository, but not the file itself -- it creates a pointer file within the repo, and stores the file elsewhere. If you were to clone the repository, the pointer file will act as a map to show you how to obtain the original file.
Git LFS data upload limits are based on your GitHub subscription:
- 2 GB for GitHub free and GitHub Pro
- 4 GB for GitHub Team
- 5 GB for GitHub Enterprise Cloud
Useful GitHub Features
At its core, GitHub is just a place to host your Git repositories. However, it offers a lot of functionality that has less to do with Git, and more to do with Project Management. We will walk through a few of these useful features.
-
- Issues let you plan out changes and suggestions to a repo
- Closing/reopening
- Labels
- Assigning
- Templates
- Numbering/mentioning
-
- Pull requests are a way to request merging code from one branch to another
- typical workflow is for someone to fork a repo, then make a PR from that repo to another
- Reviews
- Commenting
- Merging
- Closing issues
-
- You can use Organizations to organize sets of repositories
- Roles
- Teams
- GitHub documentation:
-
Other neat things
- Permissions/collaborators
- GitHub Classroom
- Gists
- CSV and map rendering
- Code editor
Beyond Git and GitHub
There are other platforms that address Version Control and have similar functionalities to GitHub:
-
GitLab: An alternative to GitHub, GitLab offers both a cloud-hosted platform and a self-hosted option (GitLab CE/EE). It provides a comprehensive DevOps platform with built-in CI/CD, container registry, and more.
-
Bitbucket: Atlassian's Bitbucket is a Git repository hosting service that also supports Mercurial repositories. It offers integration with Jira, Confluence, and other Atlassian products.
-
SourceForge: A platform that provides Git and Subversion hosting, as well as tools for project management, issue tracking, and collaboration.
-
AWS CodeCommit: Part of Amazon Web Services (AWS), CodeCommit is a managed Git service that integrates seamlessly with other AWS services.
-
Azure DevOps Services (formerly VSTS)): Microsoft's Azure DevOps Services offers Git repository hosting along with a wide range of DevOps tools for planning, developing, testing, and deploying software.
-
Mercurial: Like Git, Mercurial is a distributed version control system, but with a different branching and merging model. It's an alternative to Git for version control.
Self Assessment
True or False: Using Git requires a GitHub account
False
Git is open source software.
GitHub is a privately owned (Microsoft) company
Other platforms like GitLab, GitBucket, and GNU Savannah all offer Git as a version control system service.
True or False: Using Git is easy
False
Using Git can be frustrating to even the most experienced users
When you find a new repository on GitHub that you think can help your research, what are the first things you should do?
Look at the README.md
Most GitHub repositories have a README.md file which explains what you're looking at.
Look at the LICENSE
Not all repositories are licensed the same way - be sure to check the LICENSE file to see whether the software is open source, or if it has specific requirements for reuse.
Adding Code to Github Locally
Prerequisites
You will require the following in case you want to add code locally.
Create a GitHub account
Navigate to the GitHub website and click Sign Up, and follow the on screen instructions.
Installing Git
You can follow the official guidelines here: https://github.com/git-guides/install-git. Here we recommend how to install Git on your local machine.
Windows
These instructions are for Windows users NOT using WSL2. If you do have WSL2, follow the Unix instructions.
- Navigate to the latest Git for Windows installer and download the latest version.
- Once the installer has started, follow the instructions as provided in the Git Setup wizard screen until the installation is complete.
- Search and open Git Bash. From here, you should be able to run Git commands.
MacOS
- Install Homebrew (a package manager for MacOS): `/bin/bash -c "$(curl -fsSL https://raw.githubusercontent.com/Homebrew/install/HEAD/install.sh)"``
- Install Git:
brew install git
Unix
The following command will install git and all related packages on your Unix machine.
$ sudo apt-get install -y git-all
Additionally, you can choose between Generating a Personal Access Token or using SSH keys. This is useful if you want to work locally and push your changes to GitHub. We are going to cover this further in next week's lesson on Version Control.
Choice A: Generate a Personal Access Token
You can follow the official documentation on how to generate Tokens here. We discussed how to generate tokens in Week 0. Here's are quick steps you can follow in order to setup your account on your machine using tokens:
- On your coumputer:
- Clone your repository (
git clone <repository>) - Make changes where necessary, and add (
git add <changed files>), commit (git commit -m "<message on changes>") and push your changes (git push origin). - You should be prompted to logging in your GitHub account. Put your email but not your password. Instead, open your web browser and follow the steps below:
- Clone your repository (
- On GitHub:
- Navigate to your GitHub Settings (You can access your account Settings from the drop down menu where your account icon is, on the top right of the screen)
- Scroll to the bottom of the left hand side menu to find Developer settings and open it.
- Click Personal access tokens > Tokens (classic)
- Click Generate new token > Generate new token (classic). You might need to input your Authentification code if you have enabled 2FA.
- Give it a name, and all the scopes you require (tip: select all scopes and No Expiration), then click Generate Token. Copy the new generated Token
- Back on your computer:
- If you have been following the steps above, you should still be in your shell with GitHub still asking for your password.
- Paste your Token here, and you should be logging in. Your changes should then be saved to GitHub.
Choice B: Connecting via SSH
The process of connecting your computer to GitHub using an SSH key is more expedited (and probably less confusing).
As a setup step, see if your computer is already connected to GitHub by doing ssh -T git@github.com. If the response message is git@github.com: Permission denied (publickey). it signifies that your computer is not yet linked with GitHub. To link your computer to github to the following:
- Generate an SSH key with a level of encryption that you prefer:
ssh-keygen -t ed25519 -C <your github email>. This command generates an SSH key with ed25519 encryption (harder to crack!) and adds your email as "comment" (-C, will help recongizing the user adding the key). A number of additional questions are going to ask you where you'd like to save the key and whether you'd like to add a password for protection; unless you want to save it elsewhere, feel free to use the default options. Upon completion you should see something like this:Your identification has been saved in /c/Users/<user>/.ssh/id_ed25519 Your public key has been saved in /c/Users/<user>/.ssh/id_ed25519.pub The key fingerprint is: SHA256:SMSPIStNyA00KPxuYu94KpZgRAYjgt9g4BA4kFy3g1o <your github email> The key's randomart image is: +--[ED25519 256]--+ |^B== o. | |%*=.*.+ | |+=.E =.+ | | .=.+.o.. | |.... . S | |.+ o | |+ = | |.o.o | |oo+. | +----[SHA256]-----+ - Upon generating the ssh key, copy it. You can reveal it by doing
cat ~/.ssh/id_ed25519.pub. - In GitHub, go to your settings: click your account icon on top right, and from the drop down menu, select Settings and then SSH and GPG keys. Here, click on New SSH Key, where you can then paste the newly geneated key. Add a name reflecting your machine and save changes.
Optional: if you want to check if you successfully linked your computer to GitHub, do ssh -t git@github.com. You should receive the following message: `Hi
Adding code locally is a more complex than adding code through the web page, but it allows for better control on what files you commit.
- To add or modify code locally, you need to clone the repository on your computer.
- You can then clone the repository by clicking on the Code button, and copying the link shown
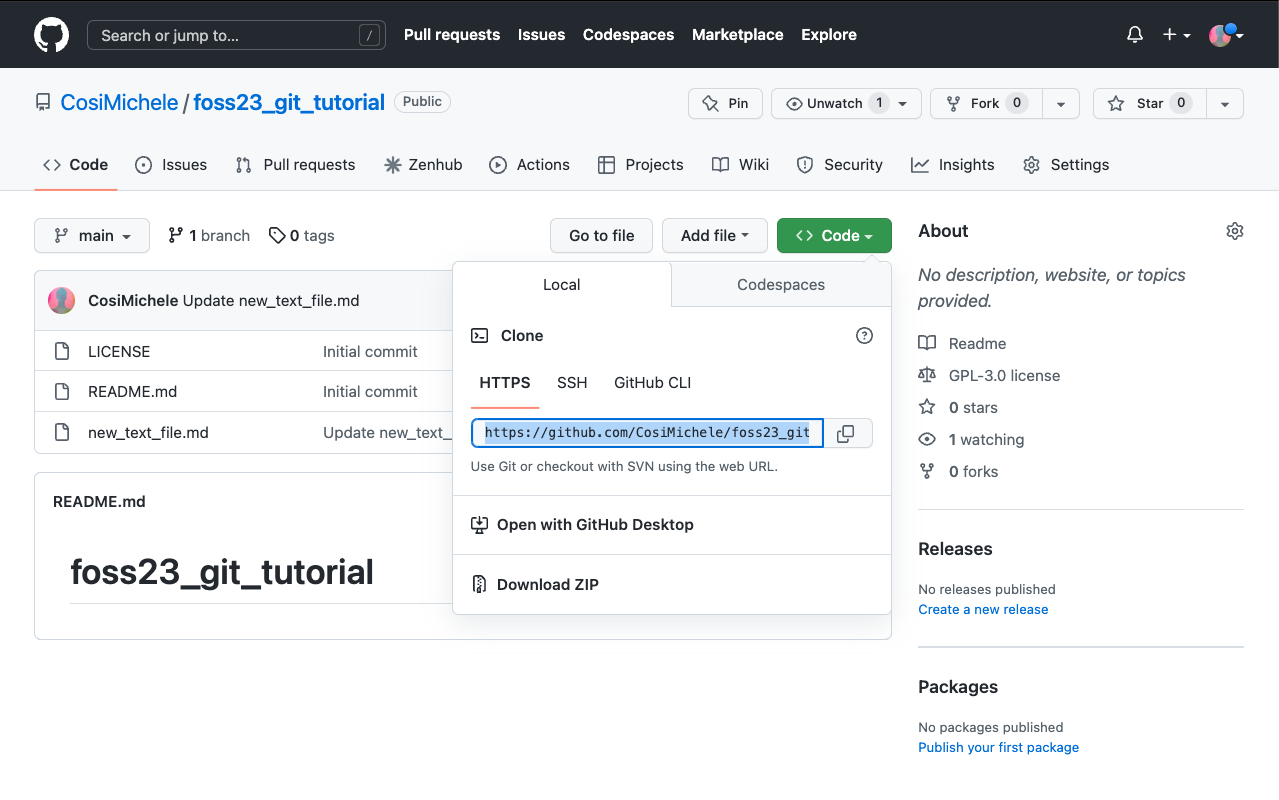
- On your machine, open a terminal window and type the following command:
$ git clone <repository address> # Replace <repository address> with the link you copied such as below $ git clone https://github.com/CosiMichele/3_git_tutorial.git Cloning into 'foss23_git_tutorial'... remote: Enumerating objects: 13, done. remote: Counting objects: 100% (13/13), done. remote: Compressing objects: 100% (12/12), done. remote: Total 13 (delta 5), reused 0 (delta 0), pack-reused 0 Unpacking objects: 100% (13/13), 14.47 KiB | 90.00 KiB/s, done. - Your code is now available to you on your machine, and you can add and modify files as needed.
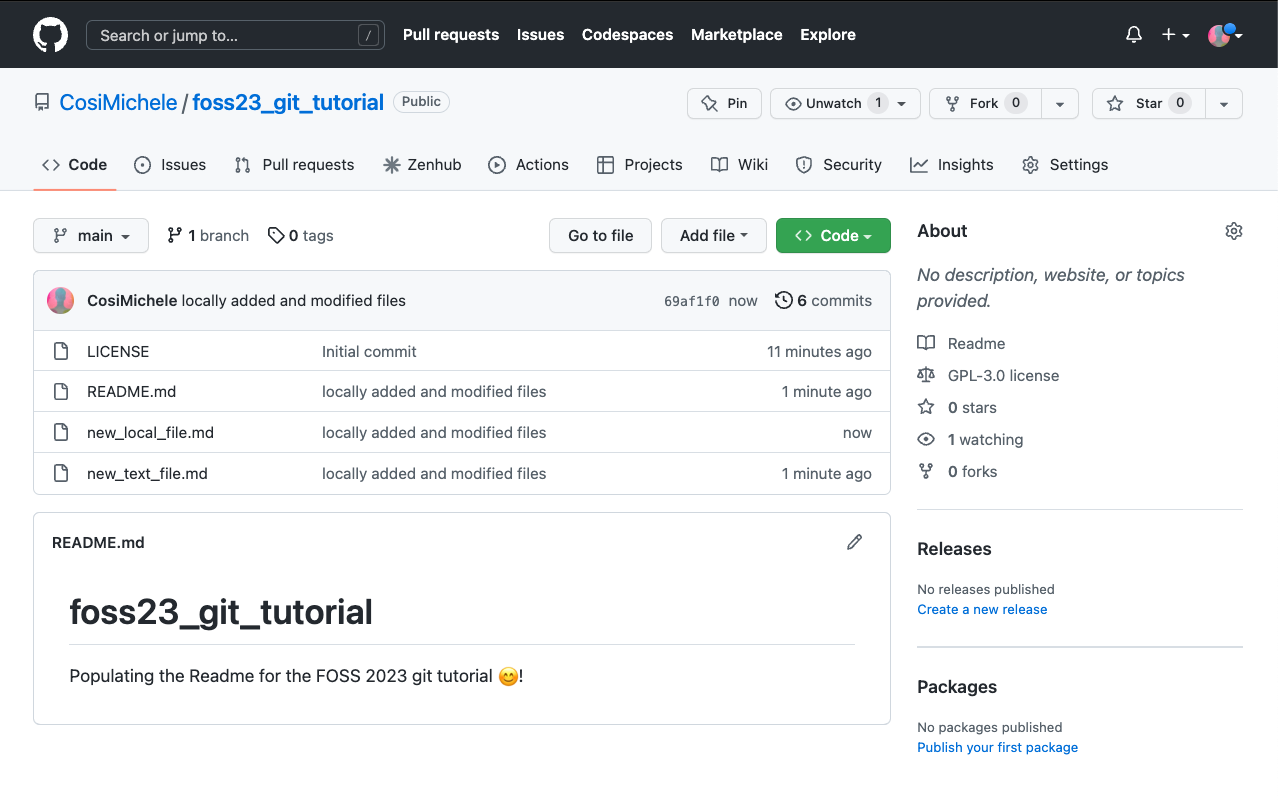
You have modified your code locally, however you still have to push it to the repository. Prior to doing so there are a couple of steps you should do:
git status: it checkes on the status of the repository (files that have been modified, deleted, added - from either local or in the online repository)git pull: it checks and "pulls" changes from the online repository to your local repository. It ensures that you are always updated on the repository files and it can save a lot of time in case there are clashing commits from different users.
To do so:
- Add all fiels you have modified and want to commit:
$ git add . # Recall that "." (period) stands for all files in a folder - Commit the changes. When committing changes, you have to add a message (in quotation marks) with the
-mflag. This message is a concise and descriptive few words about what you did:$ git commit -m "locally added and modified files" [main 05f0ef6] locally added and modified files 2 files changed, 11 insertions(+), 1 deletion(-) create mode 100644 file_from_local.md - push your changes with push:
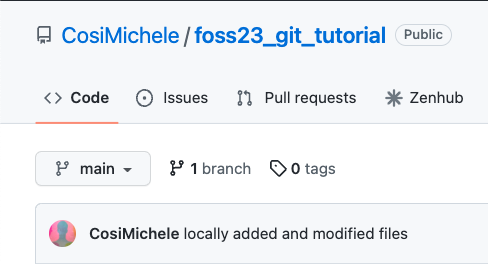
$ git push
Enumerating objects: 6, done.
Counting objects: 100% (6/6), done.
Delta compression using up to 12 threads
Compressing objects: 100% (4/4), done.
Writing objects: 100% (4/4), 585 bytes | 32.00 KiB/s, done.
Total 4 (delta 0), reused 0 (delta 0)
To https://github.com/CosiMichele/foss22_git_tutorial.git
   b649de3..05f0ef6  main -> main
First time Pushing a commit and using Tokens?
GitHub is not going to blindly allow you to push changes to the repo, but it will be asking for you to log in.
- When asked for the user name:
- Add the username that you use to login into GitHub
- When it asks you for the password:
- DO NOT PUT YOUR PASSWORD, you will require a token instead
- Generate the token by:
- On GitHub, click on your avatar (top right, and navigate to Settings)
- Scroll down to the bottom of the left hand menu, select Developer settings, and then Personal access tokens
- Now click on Generate new token (Enter password if requested)
- Choose the lenght of time for which this token is valid for, a note (for example, a reminder of what computer you're using this token on), and all the functionalities attached to it (as this is your private repository, you can select all the functionalities). Scroll to the bottom of the page and click Generate token
- Once created, the token is going to appear: copy the token and paste it in the password field in your terminal instead of your password.
You can now see the changes you made locally on the GitHub repository page.
Branching
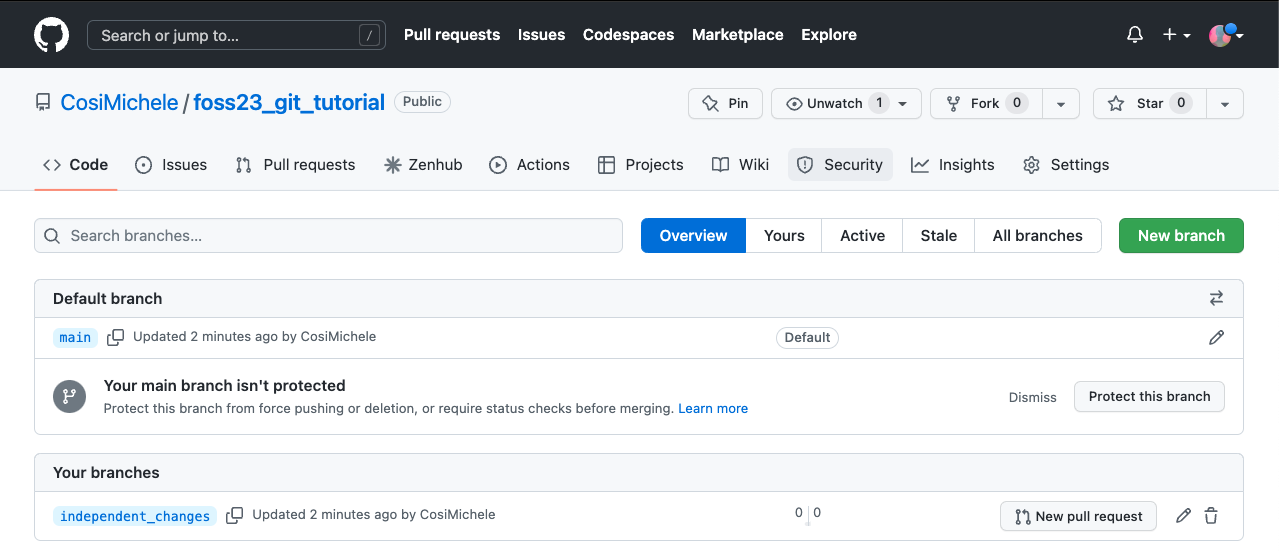
Branching allows you to develop your code whilst in a contained environment separate from your main environment. You can view the list and number of branches on the top of your repository.
Why working on branches?
Branches allow you to add/remove/change exisiting code independently from your main branch. This code can include alphas, betas and different versions of your code. Branches can be used to develop documentation or include different functionalitiets focused on Operating Systems and/or clusters and job schedulers. If needed, you can add these codes to your main branch later using pull requests.
To create a new branch select the branch icon (listing the number of branches). This will open the branch page, which will list all of the branches in this repository.
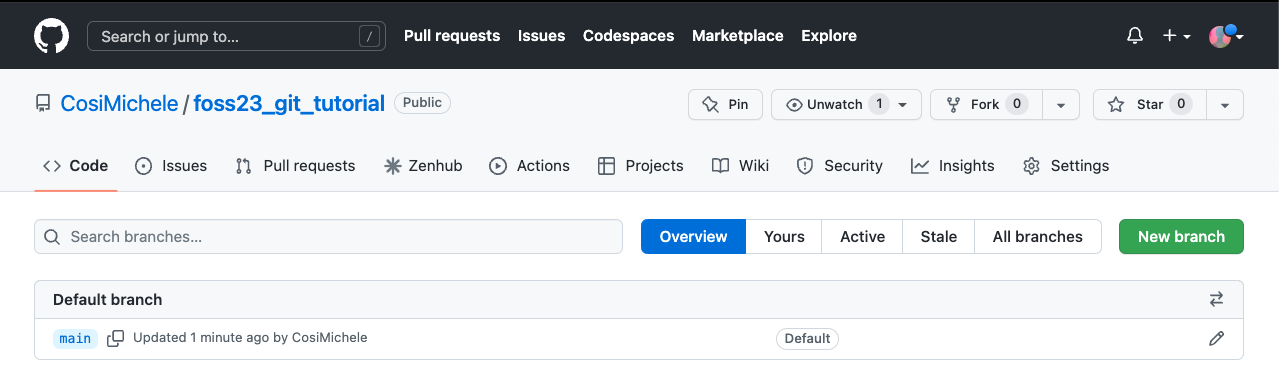
Select New Branch on the top right. Give the new branch a name of your choice, select the source of code (in this case the only source of code can be the main branch) and select Create branch.
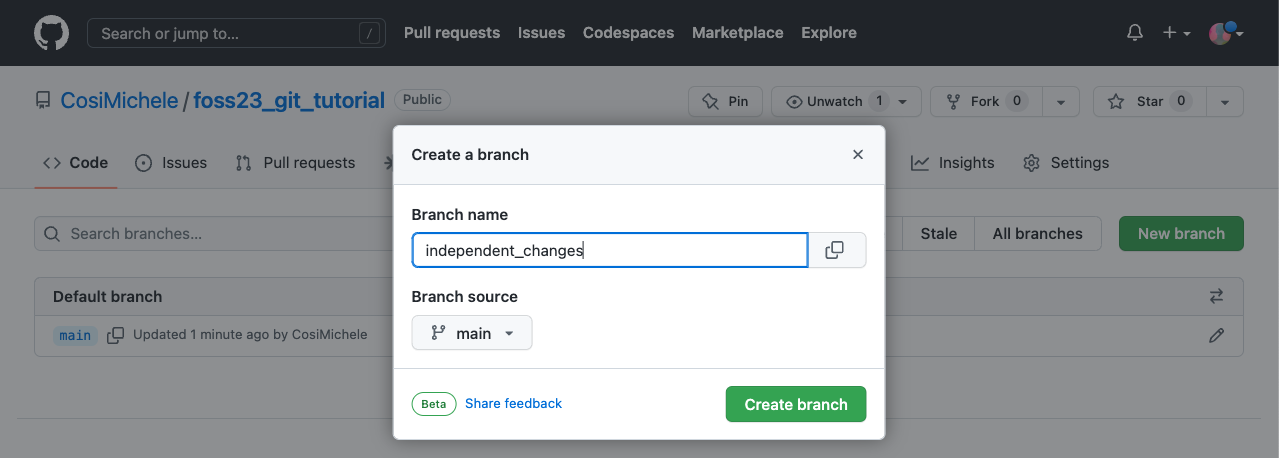
You can now see the updated list of all your branches.
You can now use this new branch to create changes you are not yet ready to put in your main branch.
Want to delete a branch?
You can delete a branch from the branch web page by clicking on the trash can icon. Beware! All the changes you've made on that branch will be deleted!
Working on your machine?
Once you create a branch online, you can change to the desired branch on your machine with git switch <branch>. Don't forget to push your changes first!
Pull and Tab
- Don't forget to perform a
git pull! - Don't know your branches? Tab! When typing
git switch, press tab to see the options of all the branches you've created.
Pull Requests
Pull requests (PR) are proposed changes you can make on a repository. In this specific case, pull requests can be used to merge changes from a branch to another. Pull requests can also come from forks of your repository that another user or collaborator has made.
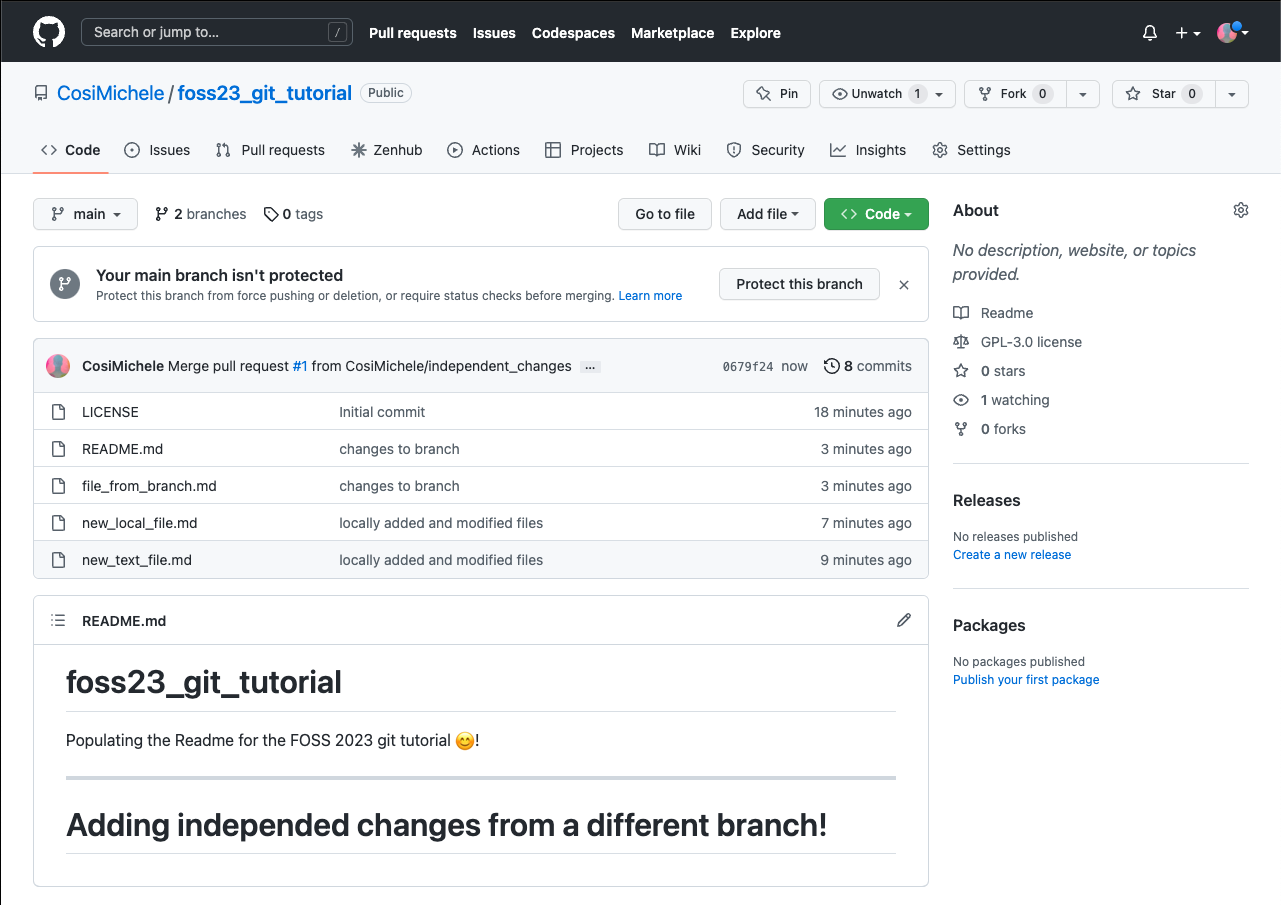
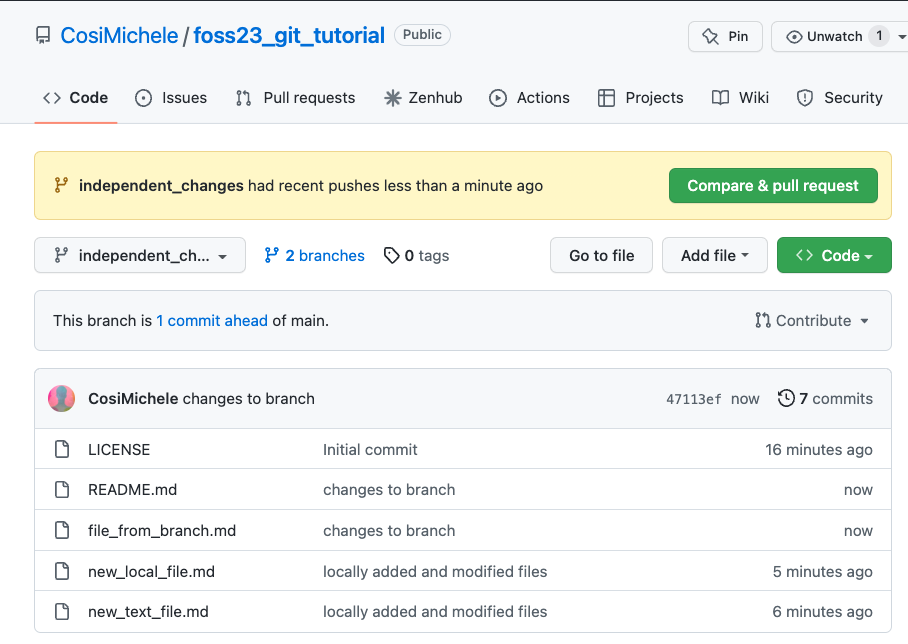
Assuming you have made changes in your branch (added a file, for example), a pop up will notify you that a branch has pushed some changes. In case you want to merge the branch and the main repository, you can review and merge by clicking the Compare & pull request button. However, you may want to wait until more changes are made.
Once you are ready to merge the changes onto your main branch, click on the branch icon, and select New pull request from the branch you have just made changes. This will open a new page which will list all the changes made showing all files that have been modified, added, or deleted. When you're done reviewing your changes, click Create pull request.
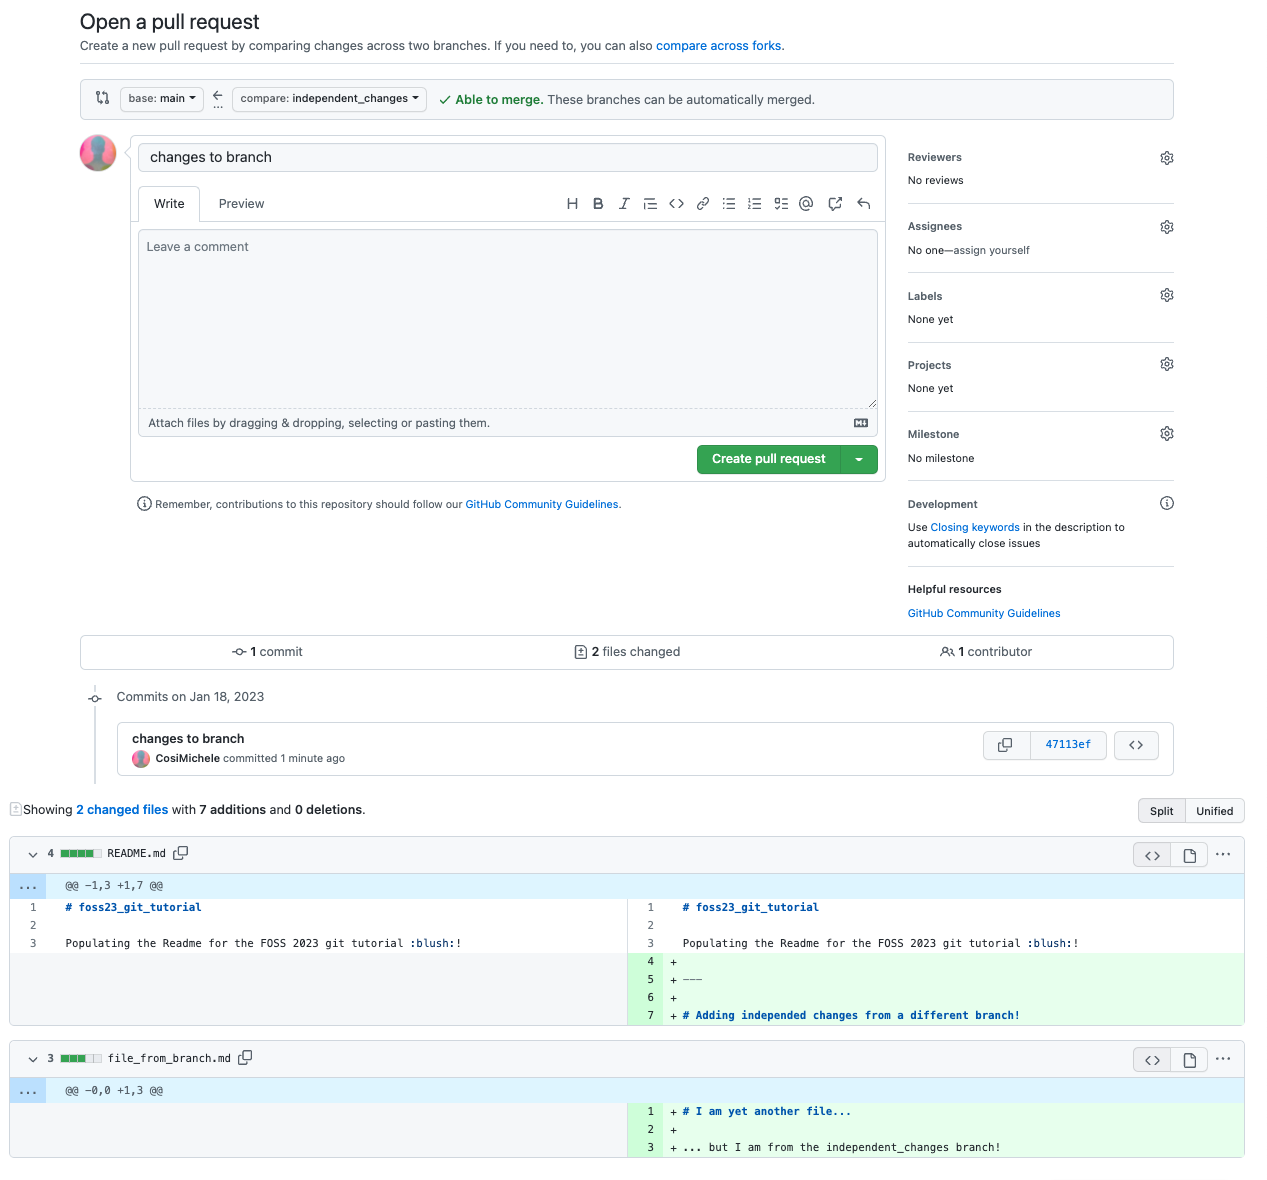
Pay attention to the information on the PR page!
The PR page will not only show you what changes you've made, but also where the changes are coming from (which branch), as well as reviewers, assigneers, labels and other information necessary when working on a big project. It will also show whether the changes are Able to be merged () or not ()!
Upon createing the pull request, a new page will open which will test whether the changes can be merged automatically. Changes that are not able to be merged usually clash with other changes other collaborators have made - this will require your revision prior to merging the PR! After revision, select Merge pull request and Confirm merge.
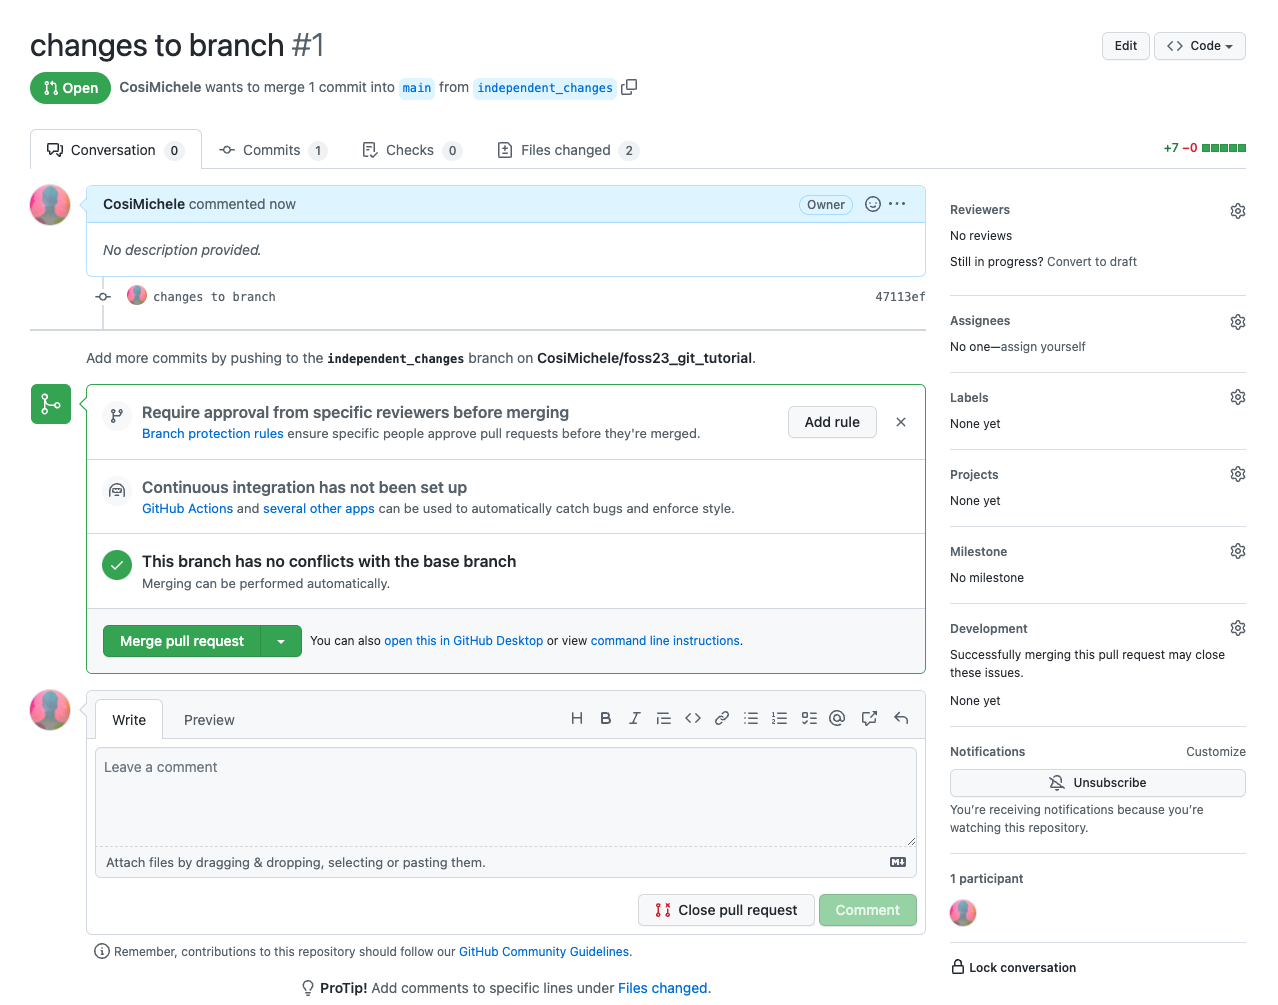
Your main repository should now have the files created in your other branch and merged through the PR!