Documentation & Communication
Learning Objectives
After this lesson, you should be able to:
- Identify and explain different types of project documentation (both internal and external)
- Describe tools and approaches to creating your own documentation
- Describe best practices for maintaining documentation
- Create your own GitHub Pages website (!)
Project Documentation
Documentation is the practice of recording, preserving, and organizing information, data, or details in a structured and systematic manner. Documentation is also essential to communicate with your future self, your collaborators, or the world on specific ideas and information. Effective documentation must take into consideration the following points:
- Clarity: Documentation should be easy to understand with clear language and no ambiguity.
- Completeness: It must cover all essential details, leaving nothing crucial undocumented.
- Accuracy: Information should be up-to-date and correct to prevent errors and misunderstandings.
- Organization: A logical structure and clear organization make it easy to navigate and find information.
- Relevance: Documentation should focus on what's pertinent to its intended audience or purpose, avoiding unnecessary information.
Not all documentation is the same. The documentation system, by Divio, categorizes the different types of documentation into 4 quadrants:
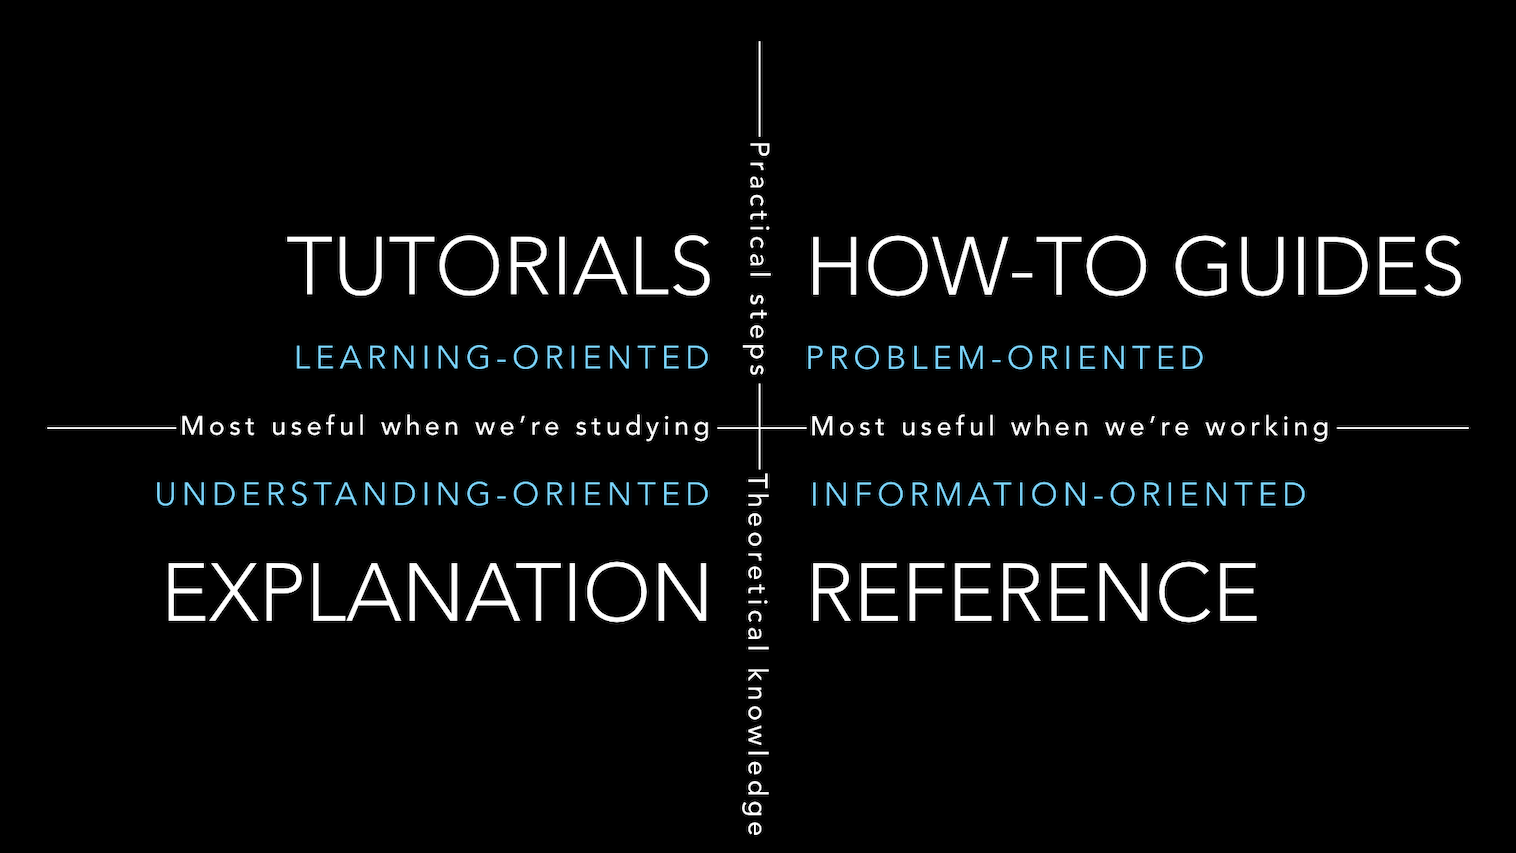
Explanining the quadrants
- Tutorials: Lessons! Tutorials are lessons that take the reader by the hand to understand how the basics of a tool work. They are what your project needs in order to show a beginner that they can achieve something with it. The techical teaching we do in FOSS are mostly tutorials. For example, we do simple tutorials to teach the mechanics of version control.
- How-to-guides: Recipes! How-to-guides take the reader through the steps required to acheive a specific outcome or answer a specific question. An example how-to-guide could be a guide on how to install a specific software on a specific operating system.
- References: References offer technical descriptions of the machinery and how to operate it. References have one job only: to describe. They are code-determined, because ultimately that’s what they describe: key classes, functions, APIs, and so they should list things like functions, fields, attributes and methods, and set out how to use them.
- Explanation: Discussions! The aims of explanations are to clarify and illuminate a particular topic by broadening the documentation’s coverage of a topic.
Public Repositories for Documentation
GitHub
- On Github, good documentation starts with a robust ReadMe file. The ReadMe file is the first thing that people see when they visit your repository. It is a good place to explain what your project does, how to use it, and how to contribute to it. Here is an example.
- Also on Github, you can use the Wiki feature to create a separate space for documentation. The Wiki is a place to document your project in a way that is separate from the code. Here is an example
GitHub Pages
- You can pull templates from other GitHub users for your website, e.g. Jekyll themes
- GitHub pages are free, fast, and easy to build, but limited in use of subdomain or URLs.
- The FOSS website is rendered using GitHub Pages using MkDocs and the Material theme for MkDocs.
- Other popular website generator for GitHub Pages is Bootstrap.js.
Material MkDocs
- Material Design theme for MkDocs, a static site generator geared towards (technical) project documentation.
- publish via GitHub Actions
- Uses open source Material or ReadTheDocs Themes
ReadTheDocs
- publishing websites via ReadTheDocs.com costs money.
- You can work in an offline state, where you develop the materials and publish them to your localhost using Sphinx
- You can work on a website template in a GitHub repository, and pushes are updated in near real time using ReadTheDocs.com.
- Here is example documentation of Pytorch using ReadTheDocs: PyTorch.
Bookdown
- Bookdown is an open-source R package that facilitates writing books and long-form articles/reports with R Markdown.
- Bookdown websites can be hosted by RStudio Connect
- You can publish a Bookdown website using Github Pages
Quarto
- Quarto is an open-source scientific and technical publishing system built on Pandoc
- Build a website using Quarto's template builder
- Build with Github Pages
JupyterBook
- Based on Project Jupyter
ipynband MarkDown - Uses
condapackage management
GitBook
- GitBook websites use MarkDown syntax
- Free for open source projects, paid plans are available
Confluence Wikis
- Confluence Wikis are another tool for documenting your work. You can see an example from Cyverse.
Things to remember about Documentation
-
Documentation should be written in such a way that people who did not write the documentation can read and then use or read and then teach others in the applications of the material.
-
Documentation is best treated as a living document, but version control is necessary to maintain it
-
Technology changes over time, expect to refresh documentation every 3-5 years as your projects age and progress.
Websites to Host Methods & Protocols
Open Science Framework for free. OSF can be directly linked to your ORCID.
- Integrated project management tools
- Uses templates to create a project website
- Can publish preprints from within project management tools
Protocols.io - collaborative platform and preprint server for: science methods, computational workflows, clinical trials, operational procedures, safety checklists, and instructions / manuals.
QUBES - community of math and biology educators who share resources and methods for preparing students to tackle real, complex, biological problems.
What are the benefits of using a GitHub.io website?
Github Pages are hosted directly from your GitHub repository.
Just edit, push, and your changes are live.
You do not need to run your own web server!!
Communication
Internal Project
Choosing which software to use for your internal lab communication can be complicated by the cost of setting up, the cost of maintaining, and simply by the sheer number of platforms that are out there.
For this workshop, we use SLACK (Searchable Log of All Conversation & Knowledge). Microsoft's competitor to SLACK is Microsoft Teams.
Remember, the intention of these platforms are to improve productivity & not become a distraction.
SLACK
- Slack has plenty of apps for coordinating multiple services, i.e. Calendars, Github, GoogleDrive, Box, etc.
- Free Slack is limiting (e.g., 90 day history; limited connections across workspaces).
- Paid Slack is $7.25 per user per month. (10 users for 1 year = $870)
Microsoft Teams
- Teams is used by many R1 research universities as part of their campus wide license agreement for Office 365 Business and Education
- For example, anyone with a
arizona.eduemail address can use Teams for free - Limitations:
- Not sure you can create your own Teams
- Limited to messaging with people in your university Team
Other popular alternatives
Useful links for creating a SLACK workspace
External (Public)
Communicating with the public and other members of your science community (in addition to traditional peer-review publications and conferences) is one of the most important parts of your science!
There are many ways scientists use social media and the web to share their data science ideas:
- "Science Twitter" (now X) - is really just regular Twitter, but with a focus on following other scientists and organizations, and tweeting about research you're interested in. By building up a significant following, more people will know you, know about your work, and you'll have a higher likelihood of meeting other new collaborators.
- Blogging Platforms such as Medium are a great place to self publish your writing on just about any topic. It's free to sign up and start blogging, but does have a fee for accessing premium content. Some of my favorite blogs include Toward Data Science and Chris Holmes.
- Community groups - There are lists (and lists of lists) of nationals research organizations, in which a researcher can become involved. These older organziations still rely on official websites, science journal blogs, and email lists to communicate with their members. In the earth sciences there are open groups which focus on communication like the Earth Science Information Partners (ESIP) with progressive ideas about how data and science can be done. Other groups, like The Carpentries and Research Bazaar are focused on data science training and digital literacy.
- Podcasts - Creating and distributing audio content to masses is easier than ever before. There are many podcast hosting platforms including Spotify, Podbean, Acast, and Libsyn. From there is it simple to make your podcast availble in the Google Podcast app or Apple Podcast app.
- Webinars - With platforms such as Zoom, Microsoft Teams, and Google Meet, it is so easy nowadays to host a webinar touting and explaining your science.
- Youtube - The king of video sharing platforms is a great place to post content promoting your science (and yourself!). For example, Cyverse posts lots of content on cyberinfrastructure and data processing pipelines. Some of my favorite podcasts hosted on Youtube include StarTalk and Lex Fridman.
Important
Remember: Personal and Professional Accounts are Not Isolated
You decide what you post on the internet. Your scientist identity may be a part of your personal identity on social media, it might be separate. A future employer or current employer can see your old posts. What you post in your personal accounts can be considered a reflection of the organization you work for and may be used in decisions about hiring or dismissal.
Hands-on: Building a GitHub Pages Website using MkDocs
This section is built in order to educate on and simplify the steps necessary that newcomers need to take in order to build a successful GitHub Pages hosted website.
This tutorial is inspired by academicpages, a Jekyll themed template created in order to help scientists and academics build their own websites.
The easy way would be to fork/import the foss-reference-hub website (repository) and modify it to reflect your requirements; this tutorial will cover the necessary files and repository structure you require in order to build a successful personal website.
Repository Explanation
A GitHub hosted website running the MkDocs-material theme requires the following files in order to function:
- A
docsfolder:- A folder that contains all the documents necessary to populate the website's pages.
- All of the documents that the user needs to change are in here.
- A
mkdocs.ymlfile:- A
ymlfile which contains critical information on the website structure, including themes, fonts, and extensions.
- A
- A
requirements.txtfile:- A file with a list of software necessary to build the website, primilily used by GitHub Actions.
- A
.github/workflowfolder:- Contains the
ghpages.ymlfile that controls the GitHub Action.
- Contains the
The structure of the basic repository is the following:
.
├── README.md
├── mkdocs.yml              <- Governing file for website building
├── requirements.txt        <- Requirements file for pip installation (required by website)
├── docs
│   ├── assets              <- Folder for images and additional graphic assets
│   └── index.md            <- Main website home page
└── .github
    └── workflows
        └── ghpages.yml     <- GitHub Actions controlling file
Upon pushing changes, a gh-pages branch will be automatically created by the GitHub Action; it is where the website is rendered from.
Directions A: forking or importing an existing repo
Prerequisites
You will require the following in case you want to add code locally.
Create a GitHub account
Navigate to the GitHub website and click Sign Up, and follow the on screen instructions.
Additionally, you can choose between Generating a Personal Access Token or using SSH keys. This is useful if you want to work locally and push your changes to GitHub. We are going to cover this further in next week's lesson on Version Control.
Choice A: Generate a Personal Access Token
You can follow the official documentation on how to generate Tokens here. We discussed how to generate tokens in Week 0. Here's are quick steps you can follow in order to setup your account on your machine using tokens:
- On your coumputer:
- Clone your repository (
git clone <repository>) - Make changes where necessary, and add (
git add <changed files>), commit (git commit -m "<message on changes>") and push your changes (git push origin). - You should be prompted to logging in your GitHub account. Put your email but not your password. Instead, open your web browser and follow the steps below:
- Clone your repository (
- On GitHub:
- Navigate to your GitHub Settings (You can access your account Settings from the drop down menu where your account icon is, on the top right of the screen)
- Scroll to the bottom of the left hand side menu to find Developer settings and open it.
- Click Personal access tokens > Tokens (classic)
- Click Generate new token > Generate new token (classic). You might need to input your Authentification code if you have enabled 2FA.
- Give it a name, and all the scopes you require (tip: select all scopes and No Expiration), then click Generate Token. Copy the new generated Token
- Back on your computer:
- If you have been following the steps above, you should still be in your shell with GitHub still asking for your password.
- Paste your Token here, and you should be logging in. Your changes should then be saved to GitHub.
Choice B: Connecting via SSH
The process of connecting your computer to GitHub using an SSH key is more expedited (and probably less confusing).
As a setup step, see if your computer is already connected to GitHub by doing ssh -T git@github.com. If the response message is git@github.com: Permission denied (publickey). it signifies that your computer is not yet linked with GitHub. To link your computer to github to the following:
- Generate an SSH key with a level of encryption that you prefer:
ssh-keygen -t ed25519 -C <your github email>. This command generates an SSH key with ed25519 encryption (harder to crack!) and adds your email as "comment" (-C, will help recongizing the user adding the key). A number of additional questions are going to ask you where you'd like to save the key and whether you'd like to add a password for protection; unless you want to save it elsewhere, feel free to use the default options. Upon completion you should see something like this:Your identification has been saved in /c/Users/<user>/.ssh/id_ed25519 Your public key has been saved in /c/Users/<user>/.ssh/id_ed25519.pub The key fingerprint is: SHA256:SMSPIStNyA00KPxuYu94KpZgRAYjgt9g4BA4kFy3g1o <your github email> The key's randomart image is: +--[ED25519 256]--+ |^B== o. | |%*=.*.+ | |+=.E =.+ | | .=.+.o.. | |.... . S | |.+ o | |+ = | |.o.o | |oo+. | +----[SHA256]-----+ - Upon generating the ssh key, copy it. You can reveal it by doing
cat ~/.ssh/id_ed25519.pub. - In GitHub, go to your settings: click your account icon on top right, and from the drop down menu, select Settings and then SSH and GPG keys. Here, click on New SSH Key, where you can then paste the newly geneated key. Add a name reflecting your machine and save changes.
Optional: if you want to check if you successfully linked your computer to GitHub, do ssh -t git@github.com. You should receive the following message: `Hi
- Fork or import the FOSS Reference Hub website tutorial repository branch
- Forking or importing will allow you to have your own copy of a specific repository; Cloning a repository without forking/importing it first, will lead to the changes being applied to the original repository and not your own copy. You should clone your forked or imported repository, not the original!
- Navigate to Settings > Actions > General:
- Under Action Permissions select Allow all actions and reusalbe workflows
- Under Workflow permissions select Read and write permissions and Allow GitHub Actions to create and approve pull requests
- Edit the
mkdocs.ymland push your changes- The first changes you should be making are in the first few lines in the
mkdocs.ymlfile in order to reflect your necessities:- Line 1:
site_name:change to any title you want for your website - Line 2:
site_description:give a short description of the website - Line 3:
site_author:who you are - Line 4:
site_url:change it to the URL reflected in Settings, which will most likely behttps://<github-username.github.io>/ - Line 7:
repo_name:give the name of your repository (e.g.,academicpages-mkdocsin this case) - Line 8:
repo_url:give the git repository URL - Line 11:
copyright:changeyour nameto the maintainer of the website (likely to be you)
- Line 1:
Workflow expectations
The previos changes should trigger the GitHub action workflow, which is setup to apply changes to the website every time a commit is pushed. One of the first thing that
mkdocs-materialwill do, is to create thegh-pagesbranch (in case you do not have it already). The workflow will fail because theghpages.ymlin the.github/workflowsdirectory is disabled ("commented out"). To enable it, remove the#at the beginnig on each line and commit your changes. Upon changes, the workflow should go ahead and create thegh-pagesbranch. - The first changes you should be making are in the first few lines in the
- Navigate to Settings > Pages and make sure that Source is Deploy from a branch and Branch is gh-pages, /(root)
- You should be able to access your website at
https://<github-username>.github.io/. If you cannot find your website, go to the repository's settings page and navigate to Pages: your website address will be there.
- You should be able to access your website at
- Edit documents as necessary.
- Don't forget to add, commit and push changes!
- Changes will only be visible on the website after a successful push.
- After each push, next to the commit identifier GitHub will show either a yellow circle (
 , meaning building), green check (, meaning success), or red cross (
 , meaning failure).
Failure? Try again!
If you've been given the red cross
, GitHub will notify you with what went wrong. By clicking on the , GitHub will open up a new page showing you the broken process.
Directions B: Creating your own
Prerequisites
You will require the following in case you want to add code locally.
Create a GitHub account
Navigate to the GitHub website and click Sign Up, and follow the on screen instructions.
Additionally, you can choose between Generating a Personal Access Token or using SSH keys. This is useful if you want to work locally and push your changes to GitHub. We are going to cover this further in next week's lesson on Version Control.
Choice A: Generate a Personal Access Token
You can follow the official documentation on how to generate Tokens here. We discussed how to generate tokens in Week 0. Here's are quick steps you can follow in order to setup your account on your machine using tokens:
- On your coumputer:
- Clone your repository (
git clone <repository>) - Make changes where necessary, and add (
git add <changed files>), commit (git commit -m "<message on changes>") and push your changes (git push origin). - You should be prompted to logging in your GitHub account. Put your email but not your password. Instead, open your web browser and follow the steps below:
- Clone your repository (
- On GitHub:
- Navigate to your GitHub Settings (You can access your account Settings from the drop down menu where your account icon is, on the top right of the screen)
- Scroll to the bottom of the left hand side menu to find Developer settings and open it.
- Click Personal access tokens > Tokens (classic)
- Click Generate new token > Generate new token (classic). You might need to input your Authentification code if you have enabled 2FA.
- Give it a name, and all the scopes you require (tip: select all scopes and No Expiration), then click Generate Token. Copy the new generated Token
- Back on your computer:
- If you have been following the steps above, you should still be in your shell with GitHub still asking for your password.
- Paste your Token here, and you should be logging in. Your changes should then be saved to GitHub.
Choice B: Connecting via SSH
The process of connecting your computer to GitHub using an SSH key is more expedited (and probably less confusing).
As a setup step, see if your computer is already connected to GitHub by doing ssh -T git@github.com. If the response message is git@github.com: Permission denied (publickey). it signifies that your computer is not yet linked with GitHub. To link your computer to github to the following:
- Generate an SSH key with a level of encryption that you prefer:
ssh-keygen -t ed25519 -C <your github email>. This command generates an SSH key with ed25519 encryption (harder to crack!) and adds your email as "comment" (-C, will help recongizing the user adding the key). A number of additional questions are going to ask you where you'd like to save the key and whether you'd like to add a password for protection; unless you want to save it elsewhere, feel free to use the default options. Upon completion you should see something like this:Your identification has been saved in /c/Users/<user>/.ssh/id_ed25519 Your public key has been saved in /c/Users/<user>/.ssh/id_ed25519.pub The key fingerprint is: SHA256:SMSPIStNyA00KPxuYu94KpZgRAYjgt9g4BA4kFy3g1o <your github email> The key's randomart image is: +--[ED25519 256]--+ |^B== o. | |%*=.*.+ | |+=.E =.+ | | .=.+.o.. | |.... . S | |.+ o | |+ = | |.o.o | |oo+. | +----[SHA256]-----+ - Upon generating the ssh key, copy it. You can reveal it by doing
cat ~/.ssh/id_ed25519.pub. - In GitHub, go to your settings: click your account icon on top right, and from the drop down menu, select Settings and then SSH and GPG keys. Here, click on New SSH Key, where you can then paste the newly geneated key. Add a name reflecting your machine and save changes.
Optional: if you want to check if you successfully linked your computer to GitHub, do ssh -t git@github.com. You should receive the following message: `Hi
- Create your own repository
- Add a README and a license and keep the repository public
- Create a
docsfolder- Within the folder, create an
index.mdfile
- Within the folder, create an
- Navigate to Settings > Actions > General:
- Under Action Permissions select Allow all actions and reusalbe workflows
- Under Workflow permissions select Read and write permissions and Allow GitHub Actions to create and approve pull requests
-
Create an
requirements.txtfile and populate it with the following requirement list:Expand for code!
bump2version coverage flake8 grip ipykernel livereload nbconvert>=7 pip sphinx tox twine watchdog wheel mkdocs-git-revision-date-plugin mkdocs-jupyter mkdocs-material mkdocs-pdf-export-plugin mkdocstrings mkdocstrings-crystal mkdocstrings-python-legacy #pygments>=2.10,<2.12 #pymdown-extensions<9.4 # Requirements for core jinja2>=3.0.2 markdown>=3.2 mkdocs>=1.4.0 mkdocs-material-extensions>=1.0.3 pygments>=2.12 pymdown-extensions>=9.4 # Requirements for plugins requests>=2.26 -
Create an
mkdocs.ymlfile and populate it with the following:Expand for code!
site_name: Name of your website site_description: Tell people what this website is about site_author: Who you are site_url: The website URL # Repository repo_name: The repository name repo_url: The repository URL edit_uri: edit/main/docs/ # Copyright copyright: 'Copyright © 2023 - 2024' # Configuration theme: name: material highlightjs: true font: text: Roboto code: Regular palette: scheme: default # Features features: - navigation.instant - navigation.tracking - navigation.tabs - navigation.tabs.sticky - navigation.indexes - navigation.top - toc.follow # 404 page static_templates: - 404.html # Search feature include_search_page: false search_index_only: true # Palette and theme (uses personalized colours) language: en palette: primary: custom accent: custom icon: logo: material/cogs favicon: material/cogs # Page tree nav: - Home: index.md # Extra Plugins plugins: - search - mkdocstrings - git-revision-date - mkdocs-jupyter: include_source: True ignore_h1_titles: True # Extensions (leave as is) markdown_extensions: - admonition - abbr - attr_list - def_list - footnotes - meta - md_in_html - toc: permalink: true title: On this page - pymdownx.arithmatex: generic: true - pymdownx.betterem: smart_enable: all - pymdownx.caret - pymdownx.critic - pymdownx.details - pymdownx.emoji: emoji_index: !!python/name:materialx.emoji.twemoji emoji_generator: !!python/name:materialx.emoji.to_svg - pymdownx.highlight - pymdownx.inlinehilite - pymdownx.keys - pymdownx.magiclink: repo_url_shorthand: true user: squidfunk repo: mkdocs-material - pymdownx.mark - pymdownx.smartsymbols - pymdownx.superfences: custom_fences: - name: mermaid class: mermaid format: !!python/name:pymdownx.superfences.fence_code_format - pymdownx.tabbed - pymdownx.tasklist: custom_checkbox: true - pymdownx.tilde -
Create a
.github/workflowsfolder and add aghpages.ymlwith the following:Expand for code!
name: Publish docs via GitHub on: push: branches: - main jobs: build: name: Deploy docs runs-on: ubuntu-latest steps: - uses: actions/checkout@v3 - uses: actions/setup-python@v4 with: python-version: 3.9 - name: run requirements file run: pip install -r requirements.txt - name: Deploy docs run: mkdocs gh-deploy --force env: GITHUB_TOKEN: ${{ secrets.GITHUB_TOKEN }} -
Navigate to Settings > Pages and make sure that Source is Deploy from a branch and Branch is gh-pages, /(root)
- You should be able to access your website at
https://<github-username>.github.io/. If you cannot find your website, go to the repository's settings page and navigate to Pages: your website address will be there.
- You should be able to access your website at
- Edit documents as necessary.
- Don't forget to add, commit and push changes!
- Changes will only be visible on the website after a successful push.
- After each push, next to the commit identifier GitHub will show either a yellow circle (, meaning building), green check (, meaning success), or red cross (, meaning failure).
Further Documentation
Here are some guides that you may find useful:
- MarkDown cheatsheet: for correct MarkDown synthax.
- MkDocs-material: a starting guide to MkDocs Material theme (massive list of supported emojis here).
- MkDocs-material References: more sophisticated documentation for MkDocs Material.
- YouTube link to FOSS 2022: Michael explains (~1h mark) his Jekyll-based website and gives a tutorial on how to use academicpages.
Self-Paced Material
GitHub Pages Website Quickstarts
-
- Create a GitHub account
- Clone the repo
https://github.com/username/username.github.io - Create an
index.html - Push it back to GitHub
-
- Install Material
- use a
reqirements.txt - or
pip install mkdocs-material
- use a
- Clone a repository with an existing template or create a new repo with
mkdocs new . - Run
python -m mkdocs serveto build and serve locally - Open your browser to preview the build at https://localhost:8000`
- Install Material
-
- Install R and RStudio
- Install Bookdown package with
install.packages("bookdown", dependencies=TRUE) - Open the Bookdown demo and get started
Self Assessment
True or False: Tutorials and How-to-Guides are the same
False
Tutorials are in general introductory and longer than How-to-Guides and are intended for teaching learners a new concept by describing applications and providing justifications.
How-to-Guides are more like cooking recipes which include step-by-step instructions for a specific task.
True or False: Teams should communicate over a single messaging platform.
False
While it may be advisable to push informal communication toward a platform like SLACK or Microsoft Teams, there is no one-platform-fits-all solution for managing a diverse science team.
What is the best communication platform for team science?
There is no best platform, but there are some best practices
In general, communications amongst team members may be best suited for messaging services like SLACK, Teams, or Chat.
For software development, GitHub Issues are one of the primary means of documenting changes and interactions on the web.
Formal communication over email is preferred, and is necessary for legal, budgetary, and institutional interactions.